Spinach and Tomato Stuffed Chicken Breast

**This post may contain affiliate links. I receive a small amount of compensation when you purchase from my links, which I"ll totally blow on waffle fries and sweet tea, y'all!**


This recipe is healthy, simple, and packed with flavor. Less than $1.50 per serving as well!

Spinach and tomato stuffed chicken

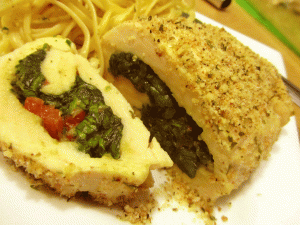
Spinach and Tomato Stuffed Chicken Breasts

Ingredients:

Stuffed Chicken Breasts:

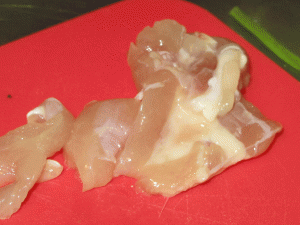
3 chicken breasts, boneless/skinless (about 2 pounds)

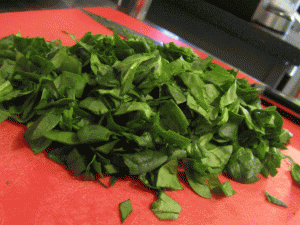
6 lightly packed cups of raw spinach

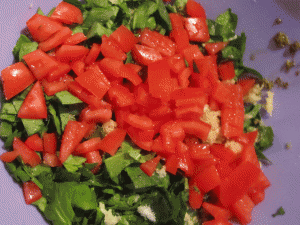
3 medium Roma tomatoes, seeded and diced

4 garlic gloves, minced

2 Tbs basil pesto

1 tsp onion powder

1/2 tsp salt

1/4 tsp pepper

Bread crumb coating:

1 Tbs olive oil

1 Tbs parmesan

1 Tbs plain bread crumbs

1/2 tsp salt

1/2 tsp pepper

1/2 tsp garlic powder

1/2 tsp parsley

Spinach and tomato stuffed chicken

Directions:

1.  Preheat oven to 350 degrees.

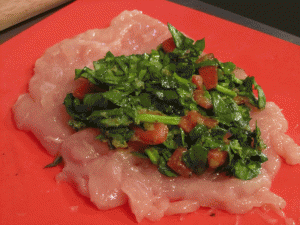
2.  Roughly chop spinach.  It doesn’t have to be perfect, it just makes the stuffing easier.

3.  Combine garlic, tomatoes, pesto, salt, pepper, and onion powder in a mixing bowl.  Add spinach and stir until mixed throughout.

4.  Trim fat from chicken breasts, if needed.

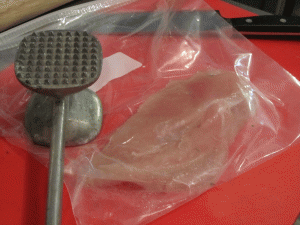
5.  Place one breast at a time into a bag and pound until flat.  Repeat for each piece of chicken.

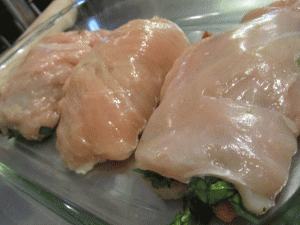
6.  Spread spinach and tomato mixture across 2/3 of each piece of chicken.  Roll toward the end without filling.

7.  Place stuffed chicken into a glass baking dish, cover with foil.

8.  Bake for 45 minutes at 350 degrees.

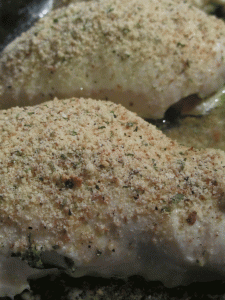
While you are waiting on the chicken to bake, mix together all of the bread crumb coating ingredients (except the oil) and set aside.  If you are going to serve your chicken with pasta, go ahead and put the water on the stove to boil as well.

9.  Remove chicken from the oven after 45 minutes, brush with oil and sprinkle with bread crumb coating.

10.  Place back in the oven at 350 degrees, uncovered, for another 5-10 minutes.

(Be sure the internal temperature of your chicken is at least 165 degrees before serving.)

We served our chicken with linguine, but it could easily go with salad or rice as well.

Spinach and tomato stuffed chicken1

Spinach and tomato stuffed chicken2

Spinach and tomato stuffed chicken3

Spinach and tomato stuffed chicken4

Spinach and tomato stuffed chicken5

Spinach and tomato stuffed chicken6

Spinach and tomato stuffed chicken7

Cost of ingredients:

Chicken – $5.40

Spinach – $0.50

Tomatoes – $0.50

Pesto – $0.40

Remaining on hand ingredients – $2.00 (I stink at this part)

Total cost – $8.80 (for six servings of 1/2 breast each)

Cost per serving – $1.47

Keep on saving!  :o)
--Barbara

**Remember, y'all, this post may contain affiliate links. I receive a small amount of compensation when you purchase from my links, which I"ll totally blow on waffle fries and sweet tea, y'all!**

Super Simple Chicken Pot Pie

**This post may contain affiliate links. I receive a small amount of compensation when you purchase from my links, which I"ll totally blow on waffle fries and sweet tea, y'all!**


So I have literally been on the phone ALL DAY LONG dealing with my children’s insurance company and trying to get some emergency room bills covered.  So, when I realized it was 5:30 and I hadn’t even started dinner, well…..

So I begrudgingly walk rush into the kitchen and start grabbing things off the shelf.  I had some leftover chicken from some quarters I had roasted last week, some canned veggies, two wrinkly squash, 3 carrots, you get the idea.  Thank God I have the ability to make dinner from nothing, because none of this food alone was enough to feed my army!  See the recipe below and the delicious looking pot pie finale!

Super simple chicken pot pie

Super Simple Chicken Pot Pie

Ingredients:

2 cups chicken (chopped, shredded, canned, whatever you have on hand)

1 can corn, drained

1 can green beans, drained

1 can evaporated milk (I used skim)

2 wrinkly squash-that-should’ve-been-thrown-out-but-they-aren’t-moldy-just-yet (or fresh, ya know, whatever), chopped

3 carrots, chopped (preferably from the back bottom of your fridge, hiding under cheese and leftovers)

1 container of Bob Evans Garlic Mashed Potatoes (got them for dirt cheap, otherwise I’d use 2 big potatoes)

2 cans of cheap-o store brand biscuits (or some bisquick mix, if you’ve got that on hand)


Directions:

Set the biscuits aside.

Dump everything else in a big bowl and microwave it for 5 minutes.

(I like to add in garlic and onion powder, parsley, salt and pepper as well.  Be creative!)

Stir, then pour into a pan, and cover with the biscuits.

Pop it in the oven at 350 for 20 minutes.

Relax.

Take a bubble bath.

Shave your legs.

Let’s be realistic.  Run around cleaning up the table so there’s room to eat.

20 minutes later, pull that delicious smelling pot pie out of the oven and wow your family with your awesome baking skills!

 Super simple chicken pot pie

Deliciousness achieved, and it only took a few minutes!

Next time you think you should just order pizza because you don’t have time to cook, think again.  For me to get enough pizza/fast food for my family of 8, I’m looking at a minimum of $20 if not $30.  Yikes!  Instead, I sucked it up for 5 minutes and put together a tasty dinner that was fairly healthy!

Cost of tonight’s tastiness:

Chicken – $2.00 (I buy leg quarters and roast them for cheap chicken for dishes)

Canned corn – $0.50

Canned green beans – $0.50

Evaporated milk – $0.50

Mashed potatoes – $1.00 (on sale w/ a coupon)

Carrots – $0.25 (buy the big bag, they keep for a while)

Squash – $0.65 ($1.29 for a pack of 4 at Aldi)

Biscuits – $1.00 (packs of 4 at Kroger for $2.00)

Total:  $6.40

Woot!  That’s for a good 8 servings, so only $0.80 per person!  I’ll take that over $30 in pizza any day!

Keep on saving!  :o)
--Barbara

**Remember, y'all, this post may contain affiliate links. I receive a small amount of compensation when you purchase from my links, which I"ll totally blow on waffle fries and sweet tea, y'all!**

Roasted Corn Salad (WF copycat)

**This post may contain affiliate links. I receive a small amount of compensation when you purchase from my links, which I"ll totally blow on waffle fries and sweet tea, y'all!**


We went to Whole Foods last week (our monthly treat) and picked up some pretty tasty corn relish.  Kenneth and I ate almost the whole container in the car on the way home!  However, at $8.00 for a 16 ounce tub, it isn’t something I’ll be likely to purchase in the future.  Lucky for me, Whole Foods lists ALL of their ingredients on their deli item labels.  I ended up making a MUCH cheaper version that is absolutely delicious, and I think my husband just fell in love with me all over again.  😛 Check it out, make it, tweak it to fit your style, and let me know what you think!

Roasted Corn Salad

Roasted Corn Salad

Ingredients:

6 c. of frozen sweet corn

1/2 c. oil (approximately, I forgot to measure!)

1 vidalia onion, diced

1/2 c. diced green bell pepper

1 Tbs minced fresh parsley

1 tsp minced fresh basil

2 garlic cloves, minced

3/4 c. halved cherry tomatoes

2 inch piece of jalapeno, seeded and finely chopped

1 tsp salt

1 tsp pepper

4 Tbs white wine vinegar

1 tsp lime juice

Directions:

1.  Toss corn in oil and spread out on a baking sheet.  Roast in oven on low broil until slightly browned.

2.  Remove from oven and mix with remaining ingredients.

3.  Try not to eat half the bowl immediately.

Roasted Corn Salad

Roasted Corn Salad

It is a REALLY simple recipe, but here are some shortcuts and tips to make it even easier.

-Let the corn thaw slightly before tossing with oil.  Otherwise you just end up with a big frozen chunk of corn.

-Put your parley, basil, jalapeno, and seeded jalapeno in the food processor.  Pulse until finely chopped.

-This salad is delish hot or cold, and is even better the second day.

-It’s not just a salad, try it on a taco or burger as well!

My version cost somewhere around $4-$5 to make about 10 cups.  That would have cost me $40 at Whole Foods!  This salad is definitely a keeper, I just need to remember to make 2x as much next time!

Keep on saving!  :o)
--Barbara

**Remember, y'all, this post may contain affiliate links. I receive a small amount of compensation when you purchase from my links, which I"ll totally blow on waffle fries and sweet tea, y'all!**

DIY Friendship Bracelet Valentines

**This post may contain affiliate links. I receive a small amount of compensation when you purchase from my links, which I"ll totally blow on waffle fries and sweet tea, y'all!**


Every year I say I am going to help my kids make cute, original valentines.  And every year, I wait until the last minute and end up with whatever cheap cartoon character cards are left in the bottom of the bins at Walmart.

Not this year, I vowed.

When I saw these adorable DIY valentines from Dandee Designs on Pinterest, I knew I just had to make them.  She has a template available to download from her website, making them even easier.

We already had plenty of embroidery thread in our craft room, but once we got started I realized that the punches I had were too small.  Instead of buying a larger, $15 paper punch, we just decided to run with strips and change the wording.

Valentines friendship bracelets

These are really simple and can be a great way to spend a few hours with your children, making gifts for their friends.

Valentines friendship bracelets1

Did I mention we have to make 70? O.o

Way cooler than cheap candy, and they’ll last a lot longer as well!

Valentines friendship bracelets2

Want this template?  Grab the download for free here!

DIY-Valentine-2012 DIY-Valentine-2012-231x300

(Printing on cardstock is best, but regular paper will work fine as well)

Keep on saving!  :o)
--Barbara

**Remember, y'all, this post may contain affiliate links. I receive a small amount of compensation when you purchase from my links, which I"ll totally blow on waffle fries and sweet tea, y'all!**

DIY Headboard

**This post may contain affiliate links. I receive a small amount of compensation when you purchase from my links, which I"ll totally blow on waffle fries and sweet tea, y'all!**


My bed has been sitting on the floor, no frame, no headboard, no nothing, for the last 2 years.  About a year ago I started shopping around for headboards and was appalled by the pricing.  I was griping to my mother, and she said, “Tiffany, just make your own!” Well duh!  I don’t know why I didn’t think of that before!  So I rushed out and bought plywood and the material I wanted for the cover.  I found 2 old, ugly comforters at a discount cloth outlet that were perfect for the padding.  (This particular outlet sells torn and stained fabric from their warehouse by the pound!)

And then I hurried home.

And did nothing with it.

For a year.

Since then, my husband has tried to throw out the wood at least a dozen times, I’ve lost the cover material more than I can count, and my kids have taken over the comforters.  Well, on Monday, I decided I had had enough.  I gathered all of the materials and got to work!

Materials used:

1 4×8 plywood board ($5)

1 used brown suede zippy cover thing ($1)

2 used large, ugly comforters ($4)

Tools needed:

Circular saw

Staple gun

Measuring tape

Chalk

Scissors (I used bandage scissors, they worked GREAT!)

DIY Headboard

Directions:

1. Measure and cut the wood down to the size you need.

I cut mine .  It didn’t occur to me to take pictures until after I got started, so no visual for this step!

2.  Fold first comforter and lay out across board, cut off excess.

I don’t own sawhorses, so I used two plastic tables instead.  It helped A LOT to line the edge of the board up with the table edge.  I also spent forever hacking away at the comforter with kitchen shears until my husband suggested the bandage scissors.  What a lifesaver!  By the way, it doesn’t have to look perfect. 🙂

DIY Headboard

DIY Headboard

3.  Staple around the edges, pulling the comforter tight as you go. Pretty simple, I stapled about every 4 inches or so.

DIY Headboard

4. Lay out the second comforter, cut slightly larger than the first.

This one will get folded over the back of the board, so cut it a bit longer.

DIY Headboard

5.  Flip over the board, pull the fabric tight, and start stapling!

Make sure the fabric is pulled very tight, so that you don’t end up with a saggy headboard in a few weeks!

DIY Headboard

6.  Last step, attaching the cover!

I slide the fabric underneath the board and put in 2 staples on each side as I pulled it tight.  I stapled the corners and then went down the sides to finish it off.

DIY Headboard

I wasn’t too concerned about it being exactly even and neat, since it’s the back and no one will know but me.  And you.  But you won’t tell, right?

DIY Headboard

Things NOT to do when making your own headboard:

1. Drop the finished board on your foot while trying to pick it up off the table.

2. Drop the board on the table and knock it over.

3. Fall down on the cement.

4.  Crack the debit card in your pocket when you land on the ground.

If you *do* choose to go all out, be prepared to end up with this beauty:

DIY Headboard

I seriously thought I broke my foot, but within a few hours, I was as good as new!  Now, onto the before and after shots!

DIY Headboard before

DIY Headboard after

Doesn’t it look lovely?  All for less than $10 and 30 minutes!  What’s your favorite fast DIY project?

Keep on saving!  :o)
--Barbara

**Remember, y'all, this post may contain affiliate links. I receive a small amount of compensation when you purchase from my links, which I"ll totally blow on waffle fries and sweet tea, y'all!**

(semi)New bedroom decor!

**This post may contain affiliate links. I receive a small amount of compensation when you purchase from my links, which I"ll totally blow on waffle fries and sweet tea, y'all!**


We officially moved into our home in October of 2009.  We bought a newish mattress shortly after and I bought a beautiful new comforter set from Garden Ridge for $30.  I couldn’t wait to get it home and on the bed.  It looked fabulous!  Then I washed it.  And this happened.

New to me bedroom set

That USED to be baby blue and chocolate brown.  🙁  So I have been using this horribly faded comforter set for almost 2 years, and can’t stand the sight of it.  But, this past week, Goodwill came to my rescue!  I found this beautiful comforter set for a whopping $30!  It is in immaculate condition and matches my bedroom color scheme perfectly.

Goodwill comforter set

I finished the headboard today, the down and dirty tutorial for that can be found here.  Once I got it in place, I added the comforter set for the final touch.  It’s amazing how different your room can look just from changing the comforter and pillows out.  Even my kids are impressed. 🙂

Have you done any low cost decor changes recently?  How did yours turn out?

Keep on saving!  :o)
--Barbara

**Remember, y'all, this post may contain affiliate links. I receive a small amount of compensation when you purchase from my links, which I"ll totally blow on waffle fries and sweet tea, y'all!**

Atlanta's Frugal Mom is a participant in the Amazon Services LLC Associates Program, an affiliate advertising program designed to provide a means for sites to earn advertising fees by advertising and linking to Amazon. In other words, if you click through to Amazon from some of the books or products I recommend and make a purchase, I get a small percentage in exchange for your purchase. It's a small way you can support AFM.