How I added 13 square feet to my pantry for only $63!

**This post may contain affiliate links. I receive a small amount of compensation when you purchase from my links, which I"ll totally blow on waffle fries and sweet tea, y'all!**


When we bought our home three years ago, our kitchen was really tiny.  There was a laundry room and “pantry” area beside it that led out to the garage.  We ended up knocking out the walls for that room, closing in the coat closet by the front door, and adding all of that space to the kitchen.  But I still just don’t have enough shelf space to store food for all eight of us.

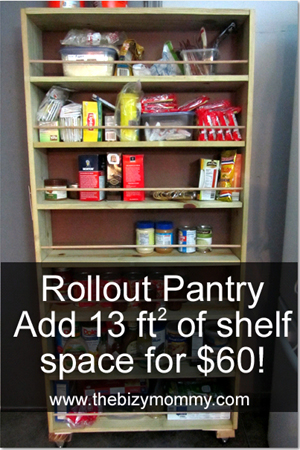
I saw a post in the past about a roll out pantry that goes beside the refrigerator.  Our old fridge was too wide to do something like that, but we recently got a new fridge that was thinner, leaving us with about 8 inches of space between it and the wall.  So I decided a few weeks ago that it was time to get to work and make a roll out pantry for our home.

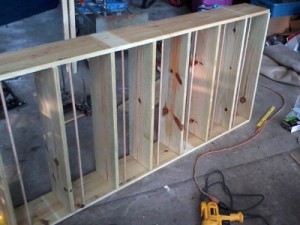
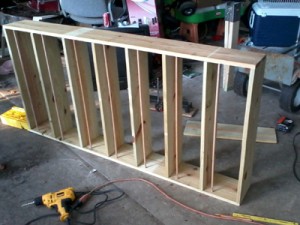
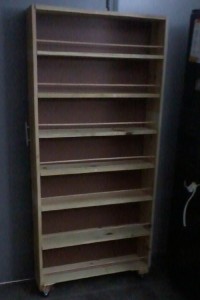
I started with a set of plans from Classy Cutter, but modified them to fit our family’s needs.  We need to have enough room for 2 rows of cans, as well as larger boxes of pasta, so I doubled the depth of the shelves to eight inches instead of four.  So instead of buying 1×4 pieces of wood, I got 1×8.  I just bought the cheapest wood available, as I’m on a pretty tight budget.  I also chose to make the bottom two shelf spaces slightly taller than the rest, so I can fit in larger items.  For the back I got a 4×8 piece of thin hardboard, it was about $12 and was in the plywood section.  Be sure to check out Classy Clutter to get the full details about how to make your own, their directions are really easy to follow!

DIY Rollout Pantry - 13sqft of space for $60!

Since I already had all of the screws and nails on hand, all I had to pick up was the wood, casters, dowels, and handle.

Supplies I purchased:

3 1x8x12 boards (cut on site into 2 64″ boards and 8 20.5″ boards)

1 sheet of 4×8 hardboard (cut down to 31.5 x 64 on site)

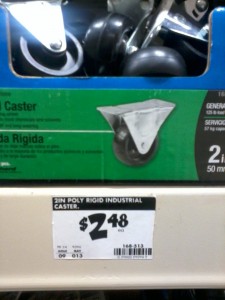
4 casters (2″ stationary 125 wheels, don’t get the swivel wheels, they make it hard to roll out the shelf)

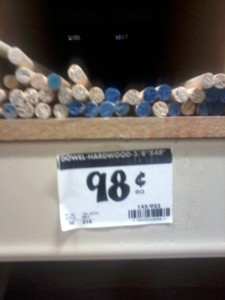
7 dowel rods (I used 3/8″ rods, and just cut them down to size at home with a hacksaw)

1 cabinet handle (There are tons to choose from under $3.00 at Home Depot)
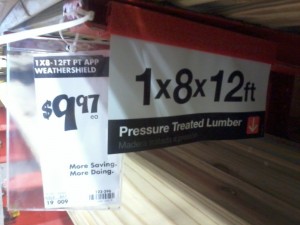
DIY Rollout Pantry - 13sqft of space for $60!

DIY Rollout Pantry - 13sqft of space for $60!


DIY Rollout Pantry - 13sqft of space for $60!

DIY Rollout Pantry - 13sqft of space for $60!

DIY Rollout Pantry - 13sqft of space for $60!

I didn’t want to bother with cutting each piece myself, so I had the associates at Home Depot cut them all for me.  Our local store will make several cuts for free, although they may charge a small fee for multiple cuts (ours is $0.25 each for anything over 2).  Even with the additional charge, it’s still worth it to me because I don’t have to spend the time to do it myself at home.  (Bonus: They didn’t charge us for the extra cuts, so I saved a few dollars!)

DIY Rollout Pantry - 13sqft of space for $60!

I’ve posted a few pictures below, but I will give you two big tips.  Make sure the wood you get from the store is STRAIGHT.  I thought our wood was, but once I started putting the shelf together, I realized there were some bowed pieces.  It still came out okay, but it took some extra screws and elbow grease before it was all said and done.  Also, for cheaper wood, be sure to check to cull lumber section of your store.  Home Depot often sells leftover cuts of wood for $0.51, so you may be able to save some more money that way.
DIY Rollout Pantry - 13sqft of space for $60!
I chose not to paint or decorate the shelf, as I really don’t care what it looks like, as long as I have the extra space for my food.  Maybe I’ll paint it eventually, but for now, I’m fine with the plain wood look.

DIY Rollout Pantry - 13sqft of space for $60!

For about $60 and a few hours of my time, I was able to add over 13 square feet of storage space to my kitchen area.  That’s a deal in my book!
DIY Rollout Pantry - 13sqft of space for $60!
Cost of supplies:

3 1×8 boards: $30
7 dowels: $7
Hardboard: $13
4 casters: $10
Handle: $3

Total spent: $63

Have you seen my DIY pot rack that freed up lots of cabinet space?  It’s less than $20 to make, and you can have it up in just 5 minutes!

Is your pantry area too small for your family?  What do you do when you can’t fit everything in the space you have now?
Keep on saving!  :o)
--Barbara

**Remember, y'all, this post may contain affiliate links. I receive a small amount of compensation when you purchase from my links, which I"ll totally blow on waffle fries and sweet tea, y'all!**

Money saver! Keep bottled water in your car

**This post may contain affiliate links. I receive a small amount of compensation when you purchase from my links, which I"ll totally blow on waffle fries and sweet tea, y'all!**


My kids are all old enough to be out of the sippy cup stage, but there are still times when we are out running errands and they ask for something to drink.  Rather than stopping at the gas station to get a sugary soda for a buck, I have started carrying bottles of water in my car.  I can pick up a case of 24 store brand bottles of water for about $3.00, which comes out to less than $0.13 a bottle.  I just throw them in the console in the front of our van, and I can pull them out and pass them around as needed.  It’s a quick, inexpensive way to have a drink on hand, and eliminates the need to stop at the gas station and get a drink.  And chips.  And candy.  And all the other things I tend to impulse buy when I’m walking up to the register.

water-saver-upright

Of course, if you are really organized, you could purchase some water bottles at the dollar store and fill them up before heading out, which would be even cheaper.  I have found that once I started carrying water with us, my kids are much less apt to ask for a drink, as they really aren’t thirsty, they just want a treat from the gas station.

water-bottle-side-by-side

Another great way to cut back on impulse spending while running errands is to keep some crackers or fruit snacks with you.  If I’m going grocery shopping before lunch time, it’s an easy way to keep the kids from “starving'” without breaking my budget.  Planning ahead is always a great idea, it’s just actually doing it that can be a challenge.

Do you find yourself stopping to purchase drinks and snacks for your kids while you are out and about?  How much money could you save each month if you just planned ahead and brought some along instead?


Keep on saving!  :o)
--Barbara

**Remember, y'all, this post may contain affiliate links. I receive a small amount of compensation when you purchase from my links, which I"ll totally blow on waffle fries and sweet tea, y'all!**

Oven Baked Shrimp

**This post may contain affiliate links. I receive a small amount of compensation when you purchase from my links, which I"ll totally blow on waffle fries and sweet tea, y'all!**


If you are on Pinterest, you have most likely seen the lemon butter shrimp picture that’s been going around.  For lunch today, I made my own version, check out the recipe below!

Oven Baked Shrimp

Oven Baked Shrimp

Ingredients:
8-10 shrimp (I used jumbo deveined, shell on)
1/2 medium sweet onion, diced
1/2 c. cherry tomatoes
1/2 lemon, sliced into thin rounds
1/2 stick of butter (4 Tbs)
2-3 tsp Old Bay seasoning
1 Tbs minced garlic
3/4 tsp onion powder
3/4 tsp garlic powder
1 tsp dried parsley flakes

Oven Baked Shrimp
Directions:

1. Preheat oven to 350.
2.  Melt butter, pour into 9″ round cake pan.
3.  Add in diced onion, garlic, and tomatoes, stir to coat in butter.
4.  Spread lemon slices around the inside of the pan.
5.  Place shrimp in single layer in pan, flipping once to coat both sides.
6.  Sprinkle with Old Bay, garlic powder, onion powder, and parsley.
7.  Bake for 15 minutes, remove and toss with pasta to serve.

Oven Baked Shrimp

This makes an easy, delicious meal and can easily be split between two people.  You could also do an Italian style with capers, artichoke, and parmesan, or even Cajun with peppers and cayenne!  I’m going to play around with the recipe in the next few days and see how it comes out if you substitute broth for the butter, I’ll be sure to link up to that recipe as well.

Oven Baked Shrimp

Do you ever use Pinterest for dinner ideas?  What is your most recent Pinterest inspired dish?

Keep on saving!  :o)
--Barbara

**Remember, y'all, this post may contain affiliate links. I receive a small amount of compensation when you purchase from my links, which I"ll totally blow on waffle fries and sweet tea, y'all!**

Frugal Family Fair Outings

**This post may contain affiliate links. I receive a small amount of compensation when you purchase from my links, which I"ll totally blow on waffle fries and sweet tea, y'all!**


We have a large county fair that comes in town each fall, and we always take our family on a Saturday and spend the whole day there.  Going to the fair can be rather expensive, especially with a large family.  We plan for several months in advance, so we can be sure to have money saved and be fully prepared for that day.  I’ve listed a few tips below on how to get the most for your money, and to make the day as fun (and less stressful) as possible.

Frugal family fair outings


Frugal Family Fair Outings

1.  Buy all access passes, in advance if possible.

Our local fair (Gwinnett County) offers the option to purchase tickets or all inclusive hand stamps.  Tickets are $1 each and each ride is at least 3 tickets.  For a flat fee of $20-25 (depending on the day), you can purchase a stamp that will allow you to ride everything.  For our family of 8, that can cost us $200!  We were able to purchase hand stamps in advance this year at a local drug store for $17 each, which saved us $64!  Even without the advance purchase discount, $200 is still a good deal for a family of our size.  We would have only been able to ride 6-8 rides each if we purchased $200 in tickets.  Instead, we were able to spend 8 hours there and ride as many things as we wanted.

Frugal family fair outings

2.  Bring your own snacks and drinks.

Fair and festival food is not only greasy and unhealthy, it is also very expensive.  Some fairs will let you bring in a bag with drinks and food.  We chose to eat a good lunch and head over around 2:00pm.  I packed beef jerky, peanuts, chips, cheese cubes, and water.  We carried it in a backpack that we took turns holding.  I also have water bottle holders that I made from old ties that my kids were able to use to carry their own drinks (see picture below).  12 water bottles get really heavy, really fast, when one person is carrying them!  Our fairgrounds also have a nice, cold water fountain, so we were able to refill bottles as they were emptied.  If you are particular about the taste of water from a fountain, you could always bring packets of flavoring, such as Kool-Aid or lemonade to add to your bottle once it is refilled.  If you don’t have the option to bring in food or water, look for a booth that will allow you to purchase a reusable cup that can be filled at a discount.  Ours offered fresh lemonade for $5, with a $3 refill option, and $3 cokes with a $1.50 refill.  Also be sure to check and see if you can leave and get a stamp for re-entry.  If so, you could always leave a cooler in your car and take a break to have sandwiches before going back in for more fun.

Frugal family fair outings

3.  Bring along a friend or family member.

Last year, my parents joined us at the fair to lend a hand with the kids.  They didn’t want to ride anything, so there was no charge, and they enjoyed spending time with their grandkids.  They stayed for a few hours with the little ones in the kiddie land, which let us take our older kids to ride some of the larger rides.

Frugal family fair outings

4.  Let your kids earn money to buy their own treats.

We started a month before the fair with a system for our kids to earn money for goodies.  We do not give our kids a regular allowance, but instead offered them extra tasks they could do for pocket money.  We gave them the option of $1, $3, and $5 tasks, ranging from cleaning out our van to organizing the pantry shelves.  The younger ones were able to earn money buy doing simple things like sweeping the stairs or neatly organizing their bookshelf in the playroom.  They were very motivated to earn cotton candy money, and we didn’t have to listen to whining about what they wanted once we got to the fair.  And of course, it’s a great learning opportunity as well!  My oldest earned $13 to spend, while my 7 year old (not so motivated) only earned $5.  The younger one was kicking himself when he saw how much his brother was able to buy with his extra earnings.

Frugal family fair outings

5.  Plan to stay for several hours.

If you purchase an all inclusive pass, then plan to stay as long as you can so you can really get your money’s worth.  We left after lunch and arrived at around 2:00, and stayed until 10:30 that evening.  Normally my children are in bed by 8:00 at the latest, but some of the rides are just more fun to do once the sun goes down.

Frugal family fair outings

6.  Take a picture of your kids before entering the gate.

This is a great tip for any outing to a crowded venue.  If you happen to get separated from your child, you can show the security exactly what they look like and what they are wearing.  It is also important to discuss with your kids what they should do if they get lost.  My younger ones knew to stay where they were and tell an adult in uniform that they could not find their parents.  My older children knew to meet us by the restrooms, as they have a large yellow balloon above them that can be seen from anywhere on the fairgrounds.  Of course, be sure to go over the rules about strangers, and point out to children what the police officer and fair worker uniforms look like.

Frugal family fair outings

Going to the fair can be a wonderful way to spend the afternoon with your family, and give them something to look forward to each year.  With the right planning, you can save money and stress, and be able to just relax and enjoy the time with your family!

Do you have a local fair that you go to every year with your family?  What are your tips for a fun outing with the kids?

Keep on saving!  :o)
--Barbara

**Remember, y'all, this post may contain affiliate links. I receive a small amount of compensation when you purchase from my links, which I"ll totally blow on waffle fries and sweet tea, y'all!**

Sloppy Joes (with lentils!)

**This post may contain affiliate links. I receive a small amount of compensation when you purchase from my links, which I"ll totally blow on waffle fries and sweet tea, y'all!**


I am always looking for ways to cut down on our food bill and dried lentils really help out a lot.  They are very inexpensive, don’t require soaking, and are easy to incorporate into a variety of meals.  Sometimes it can be challenging figuring out how to use a new ingredient, but I have found that we can easily switch them out for ground beef in a lot of dishes.  As I experiment and come up with yummy lentil dishes, I’ll post about them so you can try them out too!

The inspiration for this sloppy joe recipe came from Namely Marly.  I modified it to suit our tastes, that and I can’t stick to a recipe to save my life!  Not only is this recipe super easy, it’s also slam full of veggies and vegan!

By the way, please excuse the horrid photos. One of the mini mafia absconded with my camera and I had to use my phone. 🙁  Anyhow, on to the deliciousness!

Sloppy Joes with lentils

Sloppy Joes with lentils

Ingredients:

1/2 lb lentils (about half a bag)
4 garlic cloves
2 large peppers (I used banana and bell, but any combo will do)
1 medium onion
1 1/2 c. rough chopped cabbage
2 medium carrots
1 can diced tomatoes
1 can tomato paste
oil (vegetable, olive, canola, etc.)
1 tsp parsley
1 tsp oregano
1 1/2 Tbs chili powder
1/2 tsp pepper
1 tsp salt
1 tsp cumin
1/2 tsp smoked paprika (REALLY adds to the flavor)
2 Tbs brown sugar

Directions:

1.  Cook lentils as directed, drain and set aside.

2.  Finely chop all vegetables.  (I’m a food processor junkie, so I just threw everything in there instead of doing it all by hand)

3.  Heat oil in a pot on med-high heat.

4.  Add in chopped vegetables and cook for 5-10 minutes, until soft.

Sloppy Joes with lentils

If it looks like veggie mush, you’re on the right track! 🙂

5.  Stir in diced tomatoes and tomato paste. (Put the diced tomatoes in the food processor for a just a few seconds if you don’t want chunks.  Literally, a few seconds, or they’ll end up like sauce)

6.  Add in all seasonings, stir well, and cook for 5 minutes.

Sloppy Joes with lentils

Starting to look a little more sloppy joe-ish

Just serve it up on buns like you would a traditional sloppy joe.  We didn’t have any in the pantry, so I went with plain ol’ sliced bread, but it was still delicious.

Sloppy Joes with lentils

Not only is this recipe quick and easy, it’s also loaded with good stuff.  You can really use any vegetables you have in your fridge.  I’m not one to go out and buy specific ingredients for a recipe, I just throw in whatever we have around here.  The brown sugar can be left out if you want, I just add it in because I find it helps get rid of that canned tomato taste.  The smoked paprika REALLY makes the flavor pop, it tastes completely different than regular paprika.  We ended up with sandwiches for all 8 of us, and enough leftover to make at least another 4 for lunch.  The kids were eating it straight out of the pot, so you know it was tasty!

Sloppy Joes with lentils

Definitely a winner with the littles!

Keep on saving!  :o)
--Barbara

**Remember, y'all, this post may contain affiliate links. I receive a small amount of compensation when you purchase from my links, which I"ll totally blow on waffle fries and sweet tea, y'all!**

Save big on summertime electric bills

**This post may contain affiliate links. I receive a small amount of compensation when you purchase from my links, which I"ll totally blow on waffle fries and sweet tea, y'all!**


I live in Georgia, where the summers are hot and sticky and all around just gross.  Our utility bills tend to be $400+ in the summer months when it’s really hot and humid.  This year, we decided to suck it up and set the thermostat a little higher than previous years.  We typically set our AC to 72, but this summer we’ve gone with 76-78 instead.  It has made a HUGE difference in our electric bill!  I was thrilled to find that our bill over this summer was about $100 less each month than last year.  That’s $400 extra bucks in savings from June-September just from a 4-6 degree change in thermostat settings!

At first, I though it would be hard to adjust, but since we started out the summer heat with a higher temperature in the home, we’ve adjusted without any problems.  Check out the list below for 5 simple ways we keep our home cooling costs down.

Save big on summertime electric bills

1. Open windows and use fans.  Sometimes it’s not just the higher temperatures that are uncomfortable, but the lack of air flow.  Using box fans in addition to our ceiling fans really helped to keep the air moving in the house.  We only set up fans in the rooms we were using, and opened windows in the morning and evening when temperatures were lower.

2.  Dress appropriately.  When temperatures are high, it only makes sense to dress in light clothing.  Instead of wearing jeans and a tshirt, we opted for tank tops and shorts.  Wearing sandals or flip flops instead of socks and tennis shoes also made a big difference.

3.  Program the thermostat.  We set our thermostat for the AC to kick on around noon to 5:00, during the hottest part of the day.  There’s no reason to have the AC running at 78 degrees at 2:00 in the morning when we’re all sleeping!

4.  Turn off the AC.  If we were planning to be gone all day, we set the thermostat to 82 degrees.  It’s ridiculous to cool the house to 78 when no one is at home.  Setting the air to 82 kept the house at a pleasant temperature without overworking the system, and it was pretty easy to cool the house a few degrees by turning the air back on once we got home.  I do not suggest turning the air off completely while your gone, however.  Trying to cool your house down from 90 degrees takes hours and you end up spending more because the system runs for hours to try and bring the temperature back down.

5.  Change the air filter.  Having a clean filter helps to keep your system running more efficiently.  Your AC cannot work as effectively if the filter is covered in dust.  Replacement filters are only a few dollars and can be changed out in a matter of minutes.

How do you cut costs on your electric bill during the hot summer months?  Share your tips below!

Keep on saving!  :o)
--Barbara

**Remember, y'all, this post may contain affiliate links. I receive a small amount of compensation when you purchase from my links, which I"ll totally blow on waffle fries and sweet tea, y'all!**

Sausage and Apples with Pineapple Teriyaki Rice

**This post may contain affiliate links. I receive a small amount of compensation when you purchase from my links, which I"ll totally blow on waffle fries and sweet tea, y'all!**


We have had this pesky can of apple pie filling sitting on the shelf for months.  I don’t even know where it came from.  And Eva constantly asks if she can eat it.  Lunchtime rolled around and this simple recipe came to mind.  It is delicious and inexpensive, just how I like ’em! 🙂

Sausage and Apples with Pineapple Teriyaki Rice

Ingredients:

For the rice

3 c. rice

4 1/2 c. water

1 1/2 c. pineapple juice

1/2 Tbsp minced garlic

1 Tbs Teriyaki sauce

For the sausage

1 lb smoked sausage, cut into 1/2″ slices (precooked, I used beef)

1 can apple pie filling

1 large onion, diced

1/2 c. pineapple juice

1 Tbs. Teriyaki sauce

salt and pepper to taste

1 Tbs canola oil


Directions:

1.  Mix all rice ingredients in a large pot on high heat.  When it starts to boil, cover loosely and turn down to low.  Leave it alone for around 15 minutes, then uncover and fluff with a fork.  Set aside.

Pineapple Teriyaki Rice

2.  Heat oil on med-high in a skillet.  Add in sausage and onions.  Cook until onions are slightly soft.

Sausage and onion

3.  Stir in remaining ingredients.  Cook until heated throughout.

Sausage, onion, and apple

4.  Serve over rice.

Pineapple Teriyaki Rice with Sausage, Onion, and Apples

Makes 6-8 large servings.

Keep on saving!  :o)
--Barbara

**Remember, y'all, this post may contain affiliate links. I receive a small amount of compensation when you purchase from my links, which I"ll totally blow on waffle fries and sweet tea, y'all!**

Quick and Easy Creamy Chicken Pasta Recipe

**This post may contain affiliate links. I receive a small amount of compensation when you purchase from my links, which I"ll totally blow on waffle fries and sweet tea, y'all!**


One of our favorite quick simple dishes that works great for busy nights is my Creamy Chicken Pasta recipe.  It is literally one of those recipes where you dump the ingredients in, mix it up, and serve.  The part that takes the longest is boiling the noodles, and while those are going you can get everything else opened up and ready to go!  This is a recipe that can easily be made by a younger child that wants to be independent and helpful (my 9 year can make it all by herself) but it’s also one that my 4 and 5 year olds can “make” with my help.

Cream Chicken Pasta - Quick and Easy

Creamy Chicken Pasta

Ingredients:

1 pound of pasta (we <3 penne)

1 can chicken (in the tuna/chili section)

1 can diced tomatoes

1 can condensed cream of chicken soup

1 can evaporated milk

1 Tbsp cornstarch

1/4 cup water

1/2 tsp salt

1/4 tsp pepper

1 Tbs garlic powder

1 Tbs parsley

1/2 Tbs onion powder

Last minute creamy chicken pasta

Directions:

1. Cook pasta according to directions, drain and set aside.

2. Heat chicken, tomatoes, evaporated milk and soup to a boil.

3. Mix cornstarch and water, slowly pour into sauce to thicken.

4. Season with herbs/spices listed, or come up with your own twist!

5. Pour drained pasta into sauce, stir to coat.

That’s it!  Quick and easy. 🙂

Side notes and ramblings…..

-The cornstarch/water slurry isn’t essential, but without it your sauce will be thin and runny.

-Breaking the chicken up with a fork before adding it into the sauce is WAY easier than trying to do it later.  Trust me.

-This is a basic recipe, have fun with it!  Add in broccoli, cheese, mushrooms, roasted red peppers, etc.


Cost of ingredients:

Pasta – $1.00

Chicken – $2.00

Tomatoes – $0.50

Cream of Chicken – $0.50

Evaporated Milk – $1.00

Total cost – $5.00

There you have it!  My Creamy Chicken Pasta recipe, only $5.00 and less than 30 minutes from start to finish!

Keep on saving!  :o)
--Barbara

**Remember, y'all, this post may contain affiliate links. I receive a small amount of compensation when you purchase from my links, which I"ll totally blow on waffle fries and sweet tea, y'all!**

Salmon Cakes with Lemon Garlic Aioli

**This post may contain affiliate links. I receive a small amount of compensation when you purchase from my links, which I"ll totally blow on waffle fries and sweet tea, y'all!**


The inspiration for this recipe came from a yummy Pinterest pic by A Nutritionist Eats.  I loved the idea but just can’t follow a recipe to save my life. 🙂  So I added in some potatoes, peppers, and onions, tweaked a few of the herbs and spices, and voila!

salmon cakes with lemon garlic aioli

Ingredients:

3 c. baked, flaked salmon
3 c. shredded potato (squeeze dry)
2 eggs
1/2 c. bread crumbs
3 minced garlic cloves
2.5 T mayonnaise
1/3 c. chopped sweet bell pepper
1/3 c. chopped onion
1 tsp dried parsley
4 tsp dried dill weed
salt and pepper, as desired

Directions:
1. Mix all ingredients thoroughly.

2. Scoop out 1/4 to 1/3 of a cup of mix, form into 3″ cakes.

3. Pan fry for 3-4 minutes on each side (in 1 Tbsp of oil)
4. Serve with aioli (recipe below) on the side. Makes 10 large cakes.
*I used 1 lb of salmon filets from Aldi and baked them for 12 minutes at 350 before flaking. I don’t care for canned salmon, and this was ready by the time I prepped the other ingredients.
*Instead of using fresh potatoes, which can be really wet and starchy, I used frozen shredded potatoes from Aldi.
salmon cakes with lemon garlic aioli
Lemon Garlic AioliMix the following together and chill while the salmon is cooking.

5 T mayonnaise
1 T lemon juice
1-2 cloves garlic, minced
salt and pepper as desired

Ingredient Cost:
Salmon – $4.00
Potatoes – $1.00
Eggs – $0.30
Bread crumbs – $0.25
Mayonnaise – $0.10
Bell pepper – $0.30
Onion – $0.05
Herbs/spices – $0.25
Total – $6.25
That’s only $0.63 per cake!
Keep on saving!  :o)
--Barbara

**Remember, y'all, this post may contain affiliate links. I receive a small amount of compensation when you purchase from my links, which I"ll totally blow on waffle fries and sweet tea, y'all!**

Homemade Fried Rice

**This post may contain affiliate links. I receive a small amount of compensation when you purchase from my links, which I"ll totally blow on waffle fries and sweet tea, y'all!**


Today I’m sharing my favorite delicious restaurant-style fried rice recipe that you can make at home for super cheap!

homemade fried rice

Homemade Fried Rice

Ingredients:

4 c. cooked white rice (chilled)

1/4 c. cooked bacon, chopped

1/4 c. browned ground beef, finely chopped

3 Tbs butter (unsalted)

1 Tbs bacon fat (save when cooking bacon)

3 large eggs

1/4-1/3 c. soy sauce (low sodium)

1/4 c. chopped green onion

1/2 tsp sesame seeds

1/4 tsp pepper

1/4 tsp salt

Directions:

1.  Preheat griddle to 400.

2.  Melt butter and bacon fat on griddle.

3.  Spread out the chilled rice on the griddle.  It should be sizzling and start to brown.

4.  Mix in the beef and bacon with the rice, then move the mixture to one side of the griddle.

5.   Whisk eggs and pour on the empty side of the griddle.  Keep moving them with the spatula, they will cook quickly at 400 degrees.

6.  Once the eggs are no longer runny, but not yet brown, combine with the rice.

7.  Add in the soy sauce, onion, salt, pepper, and sesame seeds.  Stir until combined, then remove from heat and serve.

How to make Fried Rice at home

How to make Fried Rice at home

How to make Fried Rice at home

How to make Fried Rice at home

We love getting fried rice from our local Chinese restaurant, but the cost is just way too high for 8 of us.  We can make this at home for much cheaper, less than $5.00 for eight servings!

Cost of ingredients:

Rice – $0.50

Bacon – $0.30

Beef – $0.30

Butter – $0.25

Eggs – $0.45

Soy sauce – $0.20

Remaining ingredients – $0.20

Total cost for four servings – $2.20

That’s only $0.55 each serving!

Keep on saving!  :o)
--Barbara

**Remember, y'all, this post may contain affiliate links. I receive a small amount of compensation when you purchase from my links, which I"ll totally blow on waffle fries and sweet tea, y'all!**

Atlanta's Frugal Mom is a participant in the Amazon Services LLC Associates Program, an affiliate advertising program designed to provide a means for sites to earn advertising fees by advertising and linking to Amazon. In other words, if you click through to Amazon from some of the books or products I recommend and make a purchase, I get a small percentage in exchange for your purchase. It's a small way you can support AFM.