Buried Treasure Sensory Bin

**This post may contain affiliate links. I receive a small amount of compensation when you purchase from my links, which I"ll totally blow on waffle fries and sweet tea, y'all!**


All children, young and old, love the idea of hunting for treasure.  This week’s sensory bin plays on that fascination using colorful fake coins and necklaces.  The inspiration for this bin comes from a pirate party game by The Fickle Pickle, and the original post can be found here.

Buried Treasure Sensory Bin

Buried Treasure Sensory Bin

Supplies needed:

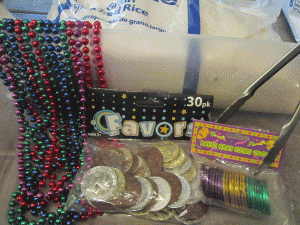
Rice (uncooked, of course)

Play necklaces

Colorful pirate coins

Suction cup hooks (optional)

Tongs (optional)

Plastic bin

Tub for sorting

Buried Treasure Sensory Bin

Fill the bin about halfway with rice, then add in your necklaces and coins.  That is, if you can get your thrilled-to-death daughter off of the bag of rice.

Buried Treasure Sensory Bin

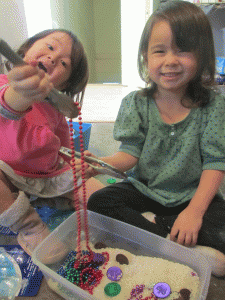
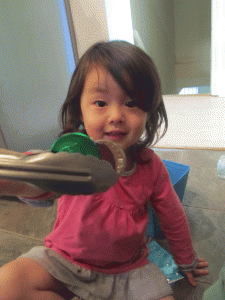
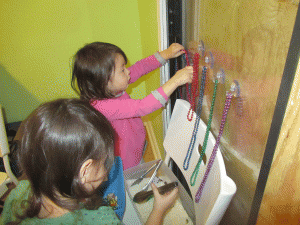
I chose to have the girls use tongs instead of their hands to dig around for treasure, as a way to work on their fine motor skills.  Using their hands works just as well. 🙂

Buried Treasure Sensory Bin

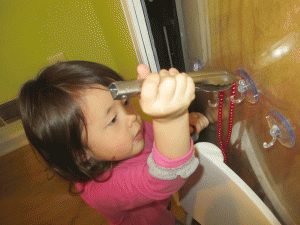
You can give them an additional bin or box at this point to put their found treasures in, or you can take it a step further and use the suction cup hooks for hanging necklaces.  I just stuck them to our sliding glass door at about eye level.

Buried Treasure Sensory Bin

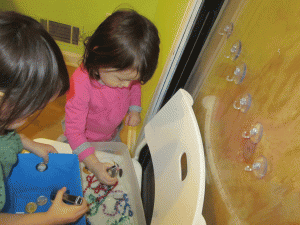
I gave them simple directions to follow.  Use the tongs to get the treasure out of the box.  Then put the coins in the blue bin and hang the necklaces on the hooks.
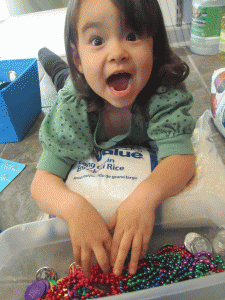
Buried Treasure Sensory Bin

They had a blast!

Buried Treasure Sensory Bin

As any parent of preschoolers will tell you, finding an activity that will keep them occupied for more than mere seconds can be a challenge.  Eva and Chooby actively played with their buried treasure bin for well over an hour, which gave me time to get some work done around my house and online.  This one is definitely a winner!

Almost all of the supplies for the buried treasure bin came from the Dollar Tree.  I had tongs at home already, but plastic ones can be found in the party/wedding supplies section of your local store, and obviously rice is pretty easy to get anywhere.  I spent a total of $7 on this bin, which was well worth it for the hours of play time it will provide in the future!

Do you have a sensory bin that your little ones really love?  Please share your ideas in the comment box below!

(Disclaimer: Be prepared for some rice on the floor.  I made it a point to remind them that if they spilled all of the rice, then their game would be over, so they tried really hard to keep it all in the bin.)

Keep on saving!  :o)
--Barbara

**Remember, y'all, this post may contain affiliate links. I receive a small amount of compensation when you purchase from my links, which I"ll totally blow on waffle fries and sweet tea, y'all!**

Ten Gift Ideas for the Whole Family

**This post may contain affiliate links. I receive a small amount of compensation when you purchase from my links, which I"ll totally blow on waffle fries and sweet tea, y'all!**


Often around the holidays, we are faced with buying gifts for families with multiple children. Trying to figure out what to get for each person, and fitting those individual gifts into your budget can be draining, both mentally and financially. One of the things we always suggest to friends and family when they ask what to buy, is that they put together a family present that everyone can enjoy. Here are some great “whole family” gifts that everyone is sure to love.

10 gift ideas for the whole family

10 Gift Ideas for the Whole Family

1. Movie passesAlmost all major movie theater companies offer gift certificates or cards that you can load with an amount of your choice.  You can also order them online in $25 and $50 denominations if there isn’t a theater near you (Regal and AMC gift cards are available on Amazon). Surprising a family with a gift card that will allow them to take their children to a movie and purchase some popcorn or candy is a gift solution that never disappoints. This works especially well for families with teens or children of varying ages, because everyone loves going to the movies! If that’s still too much for your budget, a movie gift basket is a great alternative. One or two DVDs, boxed candy and popcorn, and a bottle of soda makes for a fun night in, and they can watch the movies over and over in the future. (Psst…if you are a Costco member you can buy cheap tickets online and in store!)

Also, if you live near a Studio Movie Grill, Groupon frequently has a GREAT deal for movie tickets!


2. Museum, Aquarium or Zoo memberships

My children love to visit local museums, and we’ve received family passes as gifts in previous years that allowed us to go multiple times over the course of a year. Many museums have exhibits that change several times a year, so there is always something new to see each visit. Be sure to check and see if their local museum, aquarium, or zoo is part of a reciprocal program, such as ASTC, NARM, or AZA.  Reciprocal programs allow families to use their memberships for free admission to other participating museums, zoos and aquariums.  Another thing to consider with museums and aquariums is that they are inside, whereas zoos are not, so if they live in an area with extreme weather conditions, they may get more use from a membership that allows them to be indoors during their visits.

3. Video games

We have several gaming systems in our home, but they are specifically for use as a family.  If the family you are shopping for has an Xbox or Playstation system, buying them a game that they can play together is a wonderful gift. Just Dance and Mario Party are two of our favorites, as we can play together as a family, instead of just one or two kids zoning out in front of the television.  If the family you are purchasing for doesn’t have a gaming system, and it’s in your budget to purchase one for them, there are quite a few bundles available right now on Amazon that include the system, multiple controls, and often more than one game.


4. Board gamesBoard games can also be a lot fun, especially the ones that can be played by a wide range of ages.  Yahtzee is very popular in our house, even though the younger ones don’t really understand the concept, we team up and they have fun rolling the dice and writing down the scores.  Pictionary, Jenga, and Guesstures (like charades) are fun classic choices too. Of course, if you really want to knock it out of the park, you could go for some newer games that are SUPER popular right now, like Pie Face, Gas Out (eww, I know!) and Speak Out (aka the cheek retractor game). All of these games are simple enough for young children, yet still entertaining enough to keep the older ones involved.


5. Hotel weekend

Who doesn’t love staying the night in a nice hotel?  Find a hotel that is close to the family you are shopping for, and book them a room for the weekend.  Be sure to look for hotels that have free wifi, continental breakfast, and a pool that is open.  Some hotels even offer free happy hour appetizers in their restaurant, or a game room in the lobby.  You may not be able to buy them a vacation, but you can gift them a faux getaway, and that can still be loads of fun!  We have a hotel about 10 minutes away from us that we love to take the kids to for a treat.  They have an indoor pool, a lending library, a game room, a snack bar, free breakfast, and awesome happy hour deals.  It’s a ton of fun for them, and a nice break from the stresses of home for us.

These family gifts are sure to be enjoyed by everyone, and you don’t have to go broke buying them.  Still not sure?  Here’s another quick couple of suggestions below:

6. Outdoor games such as bocce, badminton, trampoline.  Check out these great outdoor toys for little ones!

7. Pizza/Date night Offer to take the kids out for pizza while the parents go on a date night.  Make sure to peruse Scoutmob and local Groupon deals for date night inspiration, and to try out new pizza places!

8. DVD set of classic movies (Disney is a great choice)

9. Family Fun Center pass (miniature golf, bowling, arcade, go karts)

(If all else fails, and you don’t think any of these would work for your situation, you can NEVER go wrong with #10)

10.  Amazon gift card

You can buy one last minute, you can send it via email, and they can choose whatever they want for themselves.  Clothes, games, toys, electronics, gift cards, you name it, Amazon has it.  Some people feel like gift cards can be impersonal, but I’d much rather get a gift card than some ugly sweater I’m never going to wear!

Have you ever received or given one large family gift?

What do you think about gift cards as presents?  Practical or tacky?

*This post includes affiliate links, and I earn a small commission from any items purchasedMaybe even enough to take my kids out for some family fun!*

Keep on saving!  :o)
--Barbara

**Remember, y'all, this post may contain affiliate links. I receive a small amount of compensation when you purchase from my links, which I"ll totally blow on waffle fries and sweet tea, y'all!**

Omelets in a bag – Cooking with the kids

**This post may contain affiliate links. I receive a small amount of compensation when you purchase from my links, which I"ll totally blow on waffle fries and sweet tea, y'all!**


My friend Nancy (she’s an artist, check out her stuffs y’all!) sent me a link to a post about omelets in a bag recently.  I can’t believe I had never heard of them before!

Each weekend that I have a day off from events, I try to plan a hands on breakfast that I can make with my kids.  We love omelets, but it’s hard to make 8 of them at once and still manage to eat all together.  I always have two pans going, but even so, by the time I finish cooking, the first two batches have already been gobbled up.  This method allows the kids to customize their own breakfast, and everything can be cooked all at once.  (For another delicious breakfast recipe that’s easy to make with the kids, check out my Biscuit Breakfast Bake post!)

Omelets in a bagOmelets in a bag

Directions:

1. Set out your ingredients.

2. Write everyone’s name on a bag (permanent marker).

3. Let everyone pick out their own ingredients.

4. Add a ladle of egg to each bag.

5. Double check everyone’s bags to make sure they are sealed all the way. (watery eggs, yuck!)

This time, I chopped up a wide variety of ingredients.  The kids were able to choose from peppers, onions, olives, tomatoes, peppers, cheese, apples, bacon, and more.  For seasonings, I set out cinnamon, honey, garlic powder, onion powder, jelly, pepper, and salt.  Cracking eggs can get a little messy with kids, so I did that part for them before portioning the eggs into the bags.

Omelets in a bag

6.   Put the bags into a large pot of water.  Bring to a boil.

7.  Cook for about 10 minutes, you’ll be able to see when the eggs are finished cooking.

8.  Open the bags and remove the omelets.  They should just slide right out. (No grease, oil, or butter needed!)

9.  Enjoy!

Omelets in a bag

Not only is this a quick way to prepare omelets, but it takes the caked-on egg skillets out of the equation!  My kids loved that they could choose exactly what they wanted in their omelets.  Allowing children to make their own choices about small things helps to build their confidence, and teaches them about independence.  Plus, it’s a lesson in consequences as well.  If they refuse to listen to mom and instead put in 6 Tbs of jelly and 2 Tbs of salt into their eggs, they’ll learn really quick that maybe they should have paid attention, and you won’t even have to nag!

I may be busy a lot of the time with business, but weekend breakfast with my kids is a moment I treasure.  We get a chance to talk about school, friends, their activities, and more.  It’s such a great way to start the day!  And now with this easy bagged method, we can all eat at the same time on omelet day!

(BTW, if you are a camper, this is an excellent way to cook eggs at a campsite!)

Want to make this meal even easier?  Check out some of my favorite time saving kitchen tools below!

1.  Double balloon whisk – Mine is from when I was a Pampered Chef consultant, but any brand will do.  They work so much better than a traditional whisk, and really beat things up pretty quickly.  Twice the wires means half the work time! (Be sure to use the end of the whisk to “pop” the yolks first, they’ll mix up much faster that way.)

2.  Food chopper – Another thing I had from Pampered Chef days, a food chopper really saves times on chopping up ingredients, and you can get the exact type of chop you desire, from rough to extremely fine.

3. Mini ladles – My favorite is the one ounce size.  We have a variety of ladles, but this one is the most versatile.  Works great for ladling eggs in this case, but it’s also perfect for gravy, dessert sauces, and more.  Using those huge soup ladles just doesn’t cut it sometimes!

*This post includes affiliate links, and I earn a small commission from any items purchasedMaybe even enough to take my kids out for ice cream. Or buy myself a cheap bottle of wine!*

Have you ever tried to cook eggs in a bag?  What’s your favorite way to eat your omelet?  Share your favorite recipe in the comments below!

Keep on saving!  :o)
--Barbara

**Remember, y'all, this post may contain affiliate links. I receive a small amount of compensation when you purchase from my links, which I"ll totally blow on waffle fries and sweet tea, y'all!**

Top 10 Board Books for Babies

**This post may contain affiliate links. I receive a small amount of compensation when you purchase from my links, which I"ll totally blow on waffle fries and sweet tea, y'all!**


Just because a child is too young too read doesn’t mean that they don’t still enjoy looking at books.  Sharing books with your baby is a great way to entertain them and stimulate their rapidly developing brain.  Reading to them helps encourage their speech and language development, and of course it’s a great way to spend time together.  Board books are especially wonderful, because they can play with them (and chew on them), and you don’t have to worry about pages getting torn.  You can hold them in your lap while you talk about and point out the different things in the book, but you can also let them look at board books while sitting in a high chair or during tummy time on the floor.  Books with bright, colorful pictures of real life objects, animals, and people are always a great choice, as well as “touch and feel” books that have a variety of textures for their little hands (and sometimes mouths!) to enjoy.

I’ve put together a list of my top ten favorite books that my kids have really enjoyed over the years, and that your little one is sure to love as well!

Top 10 board books for babies

© Jeanneprovost | Stock Free Images & Dreamstime Stock Photos

Top 10 Board Books for Babies

1. My First Word (Touch and Feel)

2. Peekaboo! (Baby Faces)

3. Smile! (Baby Faces)

4. Toes, Ears, & Nose!

5. Hugs and Kisses (Baby Faces)

6. Farm (Touch and Feel)

7. First 100 Words (Bright Baby)

8. The Very Hungry Caterpillar

9. Goodnight Moon

10. Brown Bear, Brown Bear, What Do You See?

Baby Faces and DK Touch and Feel books are some of my favorites for babies, as you can see from the list above.  Do you share books with your baby?  What book is your favorite one to read together?

*This post includes affiliate links, and I earn a small commission from any items purchasedMaybe even enough to add more books to our home library!*
Keep on saving!  :o)
--Barbara

**Remember, y'all, this post may contain affiliate links. I receive a small amount of compensation when you purchase from my links, which I"ll totally blow on waffle fries and sweet tea, y'all!**

Quick and Easy Salad Dressing

**This post may contain affiliate links. I receive a small amount of compensation when you purchase from my links, which I"ll totally blow on waffle fries and sweet tea, y'all!**


This dressing has become one of our favorites, and it’s so easy to make!  It’s much healthier than any of the store bought dressings available, and can be thrown together in a matter of seconds.  If you want to double or triple the recipe, it keeps just fine in the fridge.

easy salad dressing

Quick and Easy Salad Dressing

Ingredients:

Juice of one lemon

1/4 c. olive oil

1/2 tsp garlic powder

1/2 tsp kosher salt

1/4 tsp coarse ground black pepper

Whisk all ingredients together and serve immediately over mixed greens.


Variations:

-Add red pepper flakes for a little bit of spice

-Use half lemon and half orange juice

-Add minced red onion

-Mix in 1/2 tsp of Italian seasoning


Do you make your own salad dressing?  What’s your favorite recipe?

Keep on saving!  :o)
--Barbara

**Remember, y'all, this post may contain affiliate links. I receive a small amount of compensation when you purchase from my links, which I"ll totally blow on waffle fries and sweet tea, y'all!**

Copycat Recipes – Favorite Restaurant Dishes At Home

**This post may contain affiliate links. I receive a small amount of compensation when you purchase from my links, which I"ll totally blow on waffle fries and sweet tea, y'all!**


One of our biggest monthly expenses outside of regular household bills is eating out.  I vow every month not to spend so much on eating out at restaurants, but then I get tired, stressed, busy, etc. and always end up getting take out or running in for a “cheap” meal at a local restaurant.  With a family of 8, even eating “cheap” ends up being expensive!

Other than the convenience factor, the main reason we eat out is because we are wanting a particular dish that a restaurant offers.  I’m working on learning to prepare similar meals at home so that we can try to really start putting that money into savings.  Below are some of my favorite restaurant meals, with links to copycat recipes that can be prepared at home.

Restaurant Copycat recipes at home

1.  Hibachi Style Fried Rice

I love me some fried rice.  I mean, LOVE it!  There is a Japanese place near my house that makes the best rice, and I’m pretty sure it’s because they add in bacon.  Bacon makes everything tasty!  Earlier this year, I decided to try and come up with my own version of their rice, and I came pretty darn close to it.  It can be a bit time consuming if you’re trying to prepare a really large amount, but it’s delicious and super cheap compared to eating out! Check out my recipe here —-> Homemade Fried Rice

homemade fried rice

2.  Chipotle.  Anything from Chipotle!

My husband and I love Chiptole’s burritos and salads, but my kids don’t really care for their food.  We usually stop in during the day when the kids are at school, but just lunch for the two of us can easily cost $20.  The website Chipotle Fan has some great Chipotle style recipes, although I have yet to try them out.  It’s on the list for this month, because those burritos sure are tasty!

3.  Whole Foods deli

I know Whole Foods isn’t a restaurant, but I love grabbing lunch from their deli counter.  Their caesar pasta salad is to die for, and they have a roasted corn salad that is amazing.  I played around with the corn salad for a few hours and came up with an inexpensive alternative that tastes almost exactly like it!  Find my recipe version here —-> Roasted Corn Salad (WF Copycat)

Roasted Corn Salad

4.  Egg Drop Soup

Another Asian style dish, I know, but I am a big fan of Asian cuisine!  Not that yellow greasy egg drop soup, but the kind that’s made with chicken broth and is much healthier.  My favorite Chinese restaurant offers a delicious, healthier version, complete with peas, carrots, mushrooms, and mini tofu cubes.  This recipe from AllRecipes.com comes pretty close, although it doesn’t have the added veggies.  I like to add in a bit of white pepper as well, to give it a little bit of spice.

Egg Drop Soup

Photo credit: User ALFANN02 on Allrecipes

5.  Red Lobster Cheddar Bay Biscuits

Okay, I’ll admit, I’m not a huge fan of Red Lobster.  I find their food to be fairly bland, and way overpriced for the portions you receive. However, their biscuits are delicious!  This recipe from AllRecipes.com seems to be a pretty close copy, which means I can indulge at home without spending money on food that I really don’t care for!

Photo credit: User mominml on AllRecipes

Photo credit: User mominml on AllRecipes

6.  Fettuccine Alfredo

This cheesy pasta dish is delicious at almost every Italian restaurant, but the jarred sauce sold in stores just doesn’t even begin to compare.  This recipe is SO easy to make at home, with only a few ingredients to buy.  Keep in mind though, once you realize how fattening it is, you might not be so keen on eating it in the future!   Be sure to have a salad first, so that you can keep your portion sizes smaller.  I like to add in just a bit of fresh squeezed lemon juice and fresh ground black pepper, and top it off with diced roma tomatoes!

Fettuccine Alfredo

Photo credit: User Dianne of AllRecipes

7.  Loaded Baked Potato Soup from O’Charley’s

This soup is creamy and delicious, and Food.com has a great copycat recipe that you can make at home.  It’s not exactly the same, but it’s close enough!

Loaded Baked Potato Soup

Photo credit: User run for your life on Food.com

8. Cajun Jambalaya Pasta from Cheesecake Factory

This pasta dish is one of my husband’s favorite meals to eat out.  I found this recipe on Tastebook recently and can’t wait to share it with him.  It’s spicy and rich, with plenty of shrimp, chicken, and peppers to pair with the pasta.

Cheesecake Factory Cajun Jambalaya Pasta

Photo credit: User Rhonette on TasteBook.com

9.  Wing Stop Lemon Pepper Wings

When I was living in San Antonio, I fell in love with Wing Stop’s lemon pepper wings.  Alright, I was pregnant at the time, so everything tasted wonderful, but they really are delicious wings!  When we moved to our new house three years ago, I was delighted to see that there was a Wing Stop less than a mile away.  Unfortunately, taking a family of 8 to eat wings can quickly cost over $60, so we don’t go there too often.  I found this recipe from Uncommon Censor recently and can’t wait to try it out!

10. Chik-Fil-A Chicken Nuggets

I love Chik-Fil-A’s nuggets (and chicken minis!) but don’t eat there very often anymore, for several reasons which I won’t get into here. This recipe from Frieda Loves Bread comes pretty close, although I would definitely recommend using peanut oil instead of canola, as there is a big difference in taste.  That, and we all know that CFA uses peanut oil for their chicken. 🙂

I recently cooked up another delicious dish at home, be sure to check out my creamy restaurant style macaroni and cheese!

Does your family spend more than you would like on eating out?  Have you ever tried to make your favorite restaurant meals at home?

Keep on saving!  :o)
--Barbara

**Remember, y'all, this post may contain affiliate links. I receive a small amount of compensation when you purchase from my links, which I"ll totally blow on waffle fries and sweet tea, y'all!**

DIY Pot Rack: Extra cabinet space for less than $20!

**This post may contain affiliate links. I receive a small amount of compensation when you purchase from my links, which I"ll totally blow on waffle fries and sweet tea, y'all!**


As I’ve mentioned before, our kitchen just does not have enough storage space for a family of eight.  We only have a few cabinets for pots and pans, and it’s just not been working out too well these past 3 years.  In our previous home, we installed DIY pot rack that was a rod that sat on top of the cabinets on either side of the sink, and used that to hang pots and pans.  I’ve been talking about doing the same thing in this home, and finally got around to it this week.

DIY Pot Rack

Supplies needed:

1″ dowel rod 36-48 inches long (Less than $4 from Home Depot)

1 package of closet pole sockets ($2-6 at Home Depot depending on the type you purchase)

1 package of pot hooks (I got a dozen for $9 from a local store, but you can get them from Amazon
for pretty cheap as well)

DIY Pot Rack

DIY Pot Rack

DIY Pot Rack

It’s really quite simple.  You just install the pole sockets on the cabinets above your sink, cut the dowel rod to size and put it in place, and start hanging your cookware!

DIY Pot Rack

The pots and pans are close enough to the window that they aren’t in my face when I’m at the sink, and they are easy to access when cooking.  Now my two cabinets that were full of pans are freed up for other things, like my absurdly large amount of plastic containers and bowls!

DIY Pot Rack

Have you seen the roll out pantry I built to go in the empty space beside my fridge?  It only cost $63 and added 13 square feet of storage space in my kitchen!

Keep on saving!  :o)
--Barbara

**Remember, y'all, this post may contain affiliate links. I receive a small amount of compensation when you purchase from my links, which I"ll totally blow on waffle fries and sweet tea, y'all!**

White bean and chicken chili

**This post may contain affiliate links. I receive a small amount of compensation when you purchase from my links, which I"ll totally blow on waffle fries and sweet tea, y'all!**


This week my younger sister came to visit with her 4 month old son.  We met up at my parent’s house right before noon, and my mother made mention of the fact that she forgot to go to the store to pick up something for lunch.  One of my favorite things to do is make meals from random pantry and fridge items.  So I quickly got to work.

white bean chicken chili

First I checked out the fridge and pantry shelves.

white bean chicken chili

white bean chicken chili

There wasn’t much in the fridge other than drinks and condiments, but I did find a bag in the freezer with one large chicken breast.  The pantry had a decent amount of canned goods to work with, so I was confident I could pull something together.

Here’s what I ended up with:

white bean chicken chili

I pulled out some diced tomatoes, white beans, corn and peppers, chicken broth, rice, lime juice, and tortillas.  All the fixings for a southwestern style chicken and bean chili!  In the spice cabinet, I found some cilantro, paprika, chili powder, garlic powder, and cumin.

Once I had everything together and a plan in mind, this recipe only took about 15 minutes to prepare.  Check out the recipe below!

Cilantro Lime Rice

Ingredients:

1 1/2 cups rice

3 cups water

2 tsp lime juice

1/2 tsp cilantro

Directions:

1.  Add all ingredients to a large microwave safe bowl and cover.  Cook on high for 10 minutes.

2.  Stir and cook again for 5 for minutes.

3.  Remove from microwave and set aside.

white bean chicken chili - cilantro lime rice

White Bean and Chicken Chili

Ingredients:

1 large chicken breast

1 Tbs oil

1 can corn with peppers

1 can diced tomatoes

1 can white beans

2 cans chicken broth

1 tsp chili powder

2 tsp garlic powder

1/2 tsp paprika

1 tsp cumin

1/2 tsp salt

1/4 tsp pepper

2 Tbs cornstarch

1/4 cup water


Directions:

1.  Trim chicken of all fat and cut into small cubes.

2.  Heat pot to medium-high and add in oil.

3.  Add chicken to pot and cook until no longer pink.

4.  Drain tomatoes, beans, and corn.  Add to pot.

5.  Season mixture with spices, stirring well to coat.

6.  Pour in chicken broth and bring to a boil.

7.  Whisk cornstarch and water together, making sure to break up any lumps.  Add into pot and stir until thickened.

8.  Remove from heat.


Tortilla Strips

Ingredients:

2 small tortillas

1 Tbs oil


Directions:

1.  Preheat oven to 450.

2.  Cut tortillas into strips.

3.  Toss with oil until coated.

4.  Spread strips out on a pan and bake until browned.

5. Remove from heat and use to top chili.


To serve, place a scoop of rice into each bowl.  Ladle the chili over the rice and top with tortilla strips.  If you have sour cream, it makes a great addition to this tasty dish!

Just because you haven’t gone shopping or you don’t have a meal planned, doesn’t mean that you don’t have the ingredients you need already in your kitchen.  Putting together a last minute meal is easier than it seems, it just requires you to think outside the box!

Click here for a printer friendly version of this recipe!

Keep on saving!  :o)
--Barbara

**Remember, y'all, this post may contain affiliate links. I receive a small amount of compensation when you purchase from my links, which I"ll totally blow on waffle fries and sweet tea, y'all!**

Save Money With DIY School Snacks

**This post may contain affiliate links. I receive a small amount of compensation when you purchase from my links, which I"ll totally blow on waffle fries and sweet tea, y'all!**


As school days have become more hectic and crowded, our children now eat lunch just two hours after breakfast.  As a result, their teachers ask that they bring in a snack to help them get through the school day without being hungry.   Sometimes it can be tempting to purchase pre-packaged snacks, but is the time saved really worth the extra cost?  We pack our own snacks, check out these examples below:

DIY School Snacks - BIG money saver!


First up?  Cheezits.  You can buy the family size box or purchase the individual mini bags.

DIY School Snacks

21 ounces for $3.98

DIY School Snacks

15 ounces for $3.98

As you can see, both packages are $3.98.  However the family size box is 21 ounces, and the individual pack box is 15 ounces.  If you buy the large box and bag them up yourself, it’s only about $0.23 a serving, whereas the individual packs are $0.33 each.

Next up are Goldfish crackers.

DIY School Snacks

30 ounces for $6.98

DIY School Snacks

12 ounces for $4.48

DIY School Snacks

16 ounces for $2.38

Individual bags of Goldfish crackers cost $0.37 each.  If you buy the large box and bag them up yourself, it’s $0.23 a serving.  And if you take it a step further and purchase the off-brand Whales crackers, it’s only $0.15 a bag!

Another favorite in our home?  Yogurt covered raisins.

DIY School Snacks

$1.98 for an 8 ounce bag, or $2.98 for 8 boxes

An 8 ounce bag of yogurt covered raisins is enough for 8 snack bags, at only $0.25 each.  If you get the prepackaged boxes, the cost increases to over $0.37 per serving.

As you see from the pictures above, buying in bulk is always cheaper than buying individually packaged snacks.  Separating treats into snack bags only takes a few minutes, and can save several dollars each week.  My kids like to pack their own snacks, and it’s easy for them to do with a measuring cup.  It’s also a great way for them to build on their math skills!

DIY School Snacks

Packing snacks at home is simple!

For a quick review of the money we save by packing snacks ourselves, check out the numbers below:

For a week of prepackaged snacks:

Cheezits (x2): $0.33 x2 = $0.66

Goldfish: $0.37

Yogurt covered raisins (x2): $0.37 x 2 = $0.74

Total snacks for the week for our family: $1.77 per child x 6 = $10.62 ($382.32 for the year)


For a week of DIY snack bags:

Cheezits (x2): $0.23 x 2 = $0.46

Whales: $0.15

Yogurt covered raisins (x2): $0.25 x 2 = $0.50

Total snacks for the week for our family: $1.11 per child x 6 = $6.66 ($239.76 for the year)

While it may only seem like pennies each week, the savings really do add up.  Over the course of a school year, we save can save over $140 just by purchasing large packs of snacks and bagging them ourselves.  Of course, there is also the added cost of the snack bags themselves, but they cost about $0.02 each, which only adds up to another $20 over the span of the school year.  Reusable snack bags would drop that cost even lower.  If you REALLY want to save big, try making your own snack mixes and granola bars!

DIY School Snacks

Put snacks in a tub and let kids pick their own!

Could you use an extra $100 a year?  That’s enough to pay our gas bill, or 2 months of water, or 2 months of cell phone service.  Every little bit adds up, and counting pennies is a big part of staying within our budget.

Do you pack your child’s snacks at home?  Or do you feel like the convenience of prepacked snacks is worth the extra cost?

Keep on saving!  :o)
--Barbara

**Remember, y'all, this post may contain affiliate links. I receive a small amount of compensation when you purchase from my links, which I"ll totally blow on waffle fries and sweet tea, y'all!**

Treat yourself – Eat dinner at home and out for dessert

**This post may contain affiliate links. I receive a small amount of compensation when you purchase from my links, which I"ll totally blow on waffle fries and sweet tea, y'all!**


My kids love to go out to eat.  I mean, LOVE it.  Unfortunately, my wallet and bank account do not.  One thing that we have started doing is to eat dinner at home, and then take the kids out for dessert.  It’s not something we do all the time, but it’s a nice treat for them and a way to keep from spending a fortune on dining outside the home.

We usually go to a local ice cream shop instead of a sit down restaurant, so that we can keep the bill as low as possible.  Having worked in food service for several years, I always tip extremely well, but that’s difficult to do when you have a limited budget.  Instead of going to a full service restaurant and tipping a server, we just go to a self serve or counter service place where we can avoid paying a tip on top of our bill.  Two of our favorites are Five Spot and Brusters.


Eat dinner at home and grab dessert out for a cheaper way to treat yourself!

Five Spot is a frozen yogurt place where you purchase your desserts based on weight.  During the week the maximum price is $5.00, no matter what you get.  Friday through Sunday it’s only $0.44 an ounce.  Brusters single scoop cones are huge and can easily be split between two people.  They also offer free kid cones for children under a certain height.  If you’re lucky, you may be able to find a Brusters coupon book through your local school, they are only a couple of dollars and are full of BOGO coupons that never expire.

Of course, there are times when I would love to treat my family to a yummy dessert, but going out is just not an option.  I plan ahead for those times by buying a half gallon of ice cream when I’m doing my regular shopping, along with some cheap cones, whip cream, and sprinkles.  They may not get to choose from 50 different flavors, but they still enjoy the homemade ice cream sundaes just the same.

Do you enjoy the out-to-eat experience but find it hard on your wallet?  Have you ever considered just going out for dessert instead?

Keep on saving!  :o)
--Barbara

**Remember, y'all, this post may contain affiliate links. I receive a small amount of compensation when you purchase from my links, which I"ll totally blow on waffle fries and sweet tea, y'all!**

Atlanta's Frugal Mom is a participant in the Amazon Services LLC Associates Program, an affiliate advertising program designed to provide a means for sites to earn advertising fees by advertising and linking to Amazon. In other words, if you click through to Amazon from some of the books or products I recommend and make a purchase, I get a small percentage in exchange for your purchase. It's a small way you can support AFM.