Egg Breakfast Muffins & Frittata Muffins

**This post may contain affiliate links. I receive a small amount of compensation when you purchase from my links, which I"ll totally blow on waffle fries and sweet tea, y'all!**


I finally got around to making an easy, convenient, AND healthy breakfast meal last week. Actually two variations of the same thing: egg breakfast muffins and frittata muffins! And to run the risk of tooting my own horn, I must admit, they turned out pretty darn well!

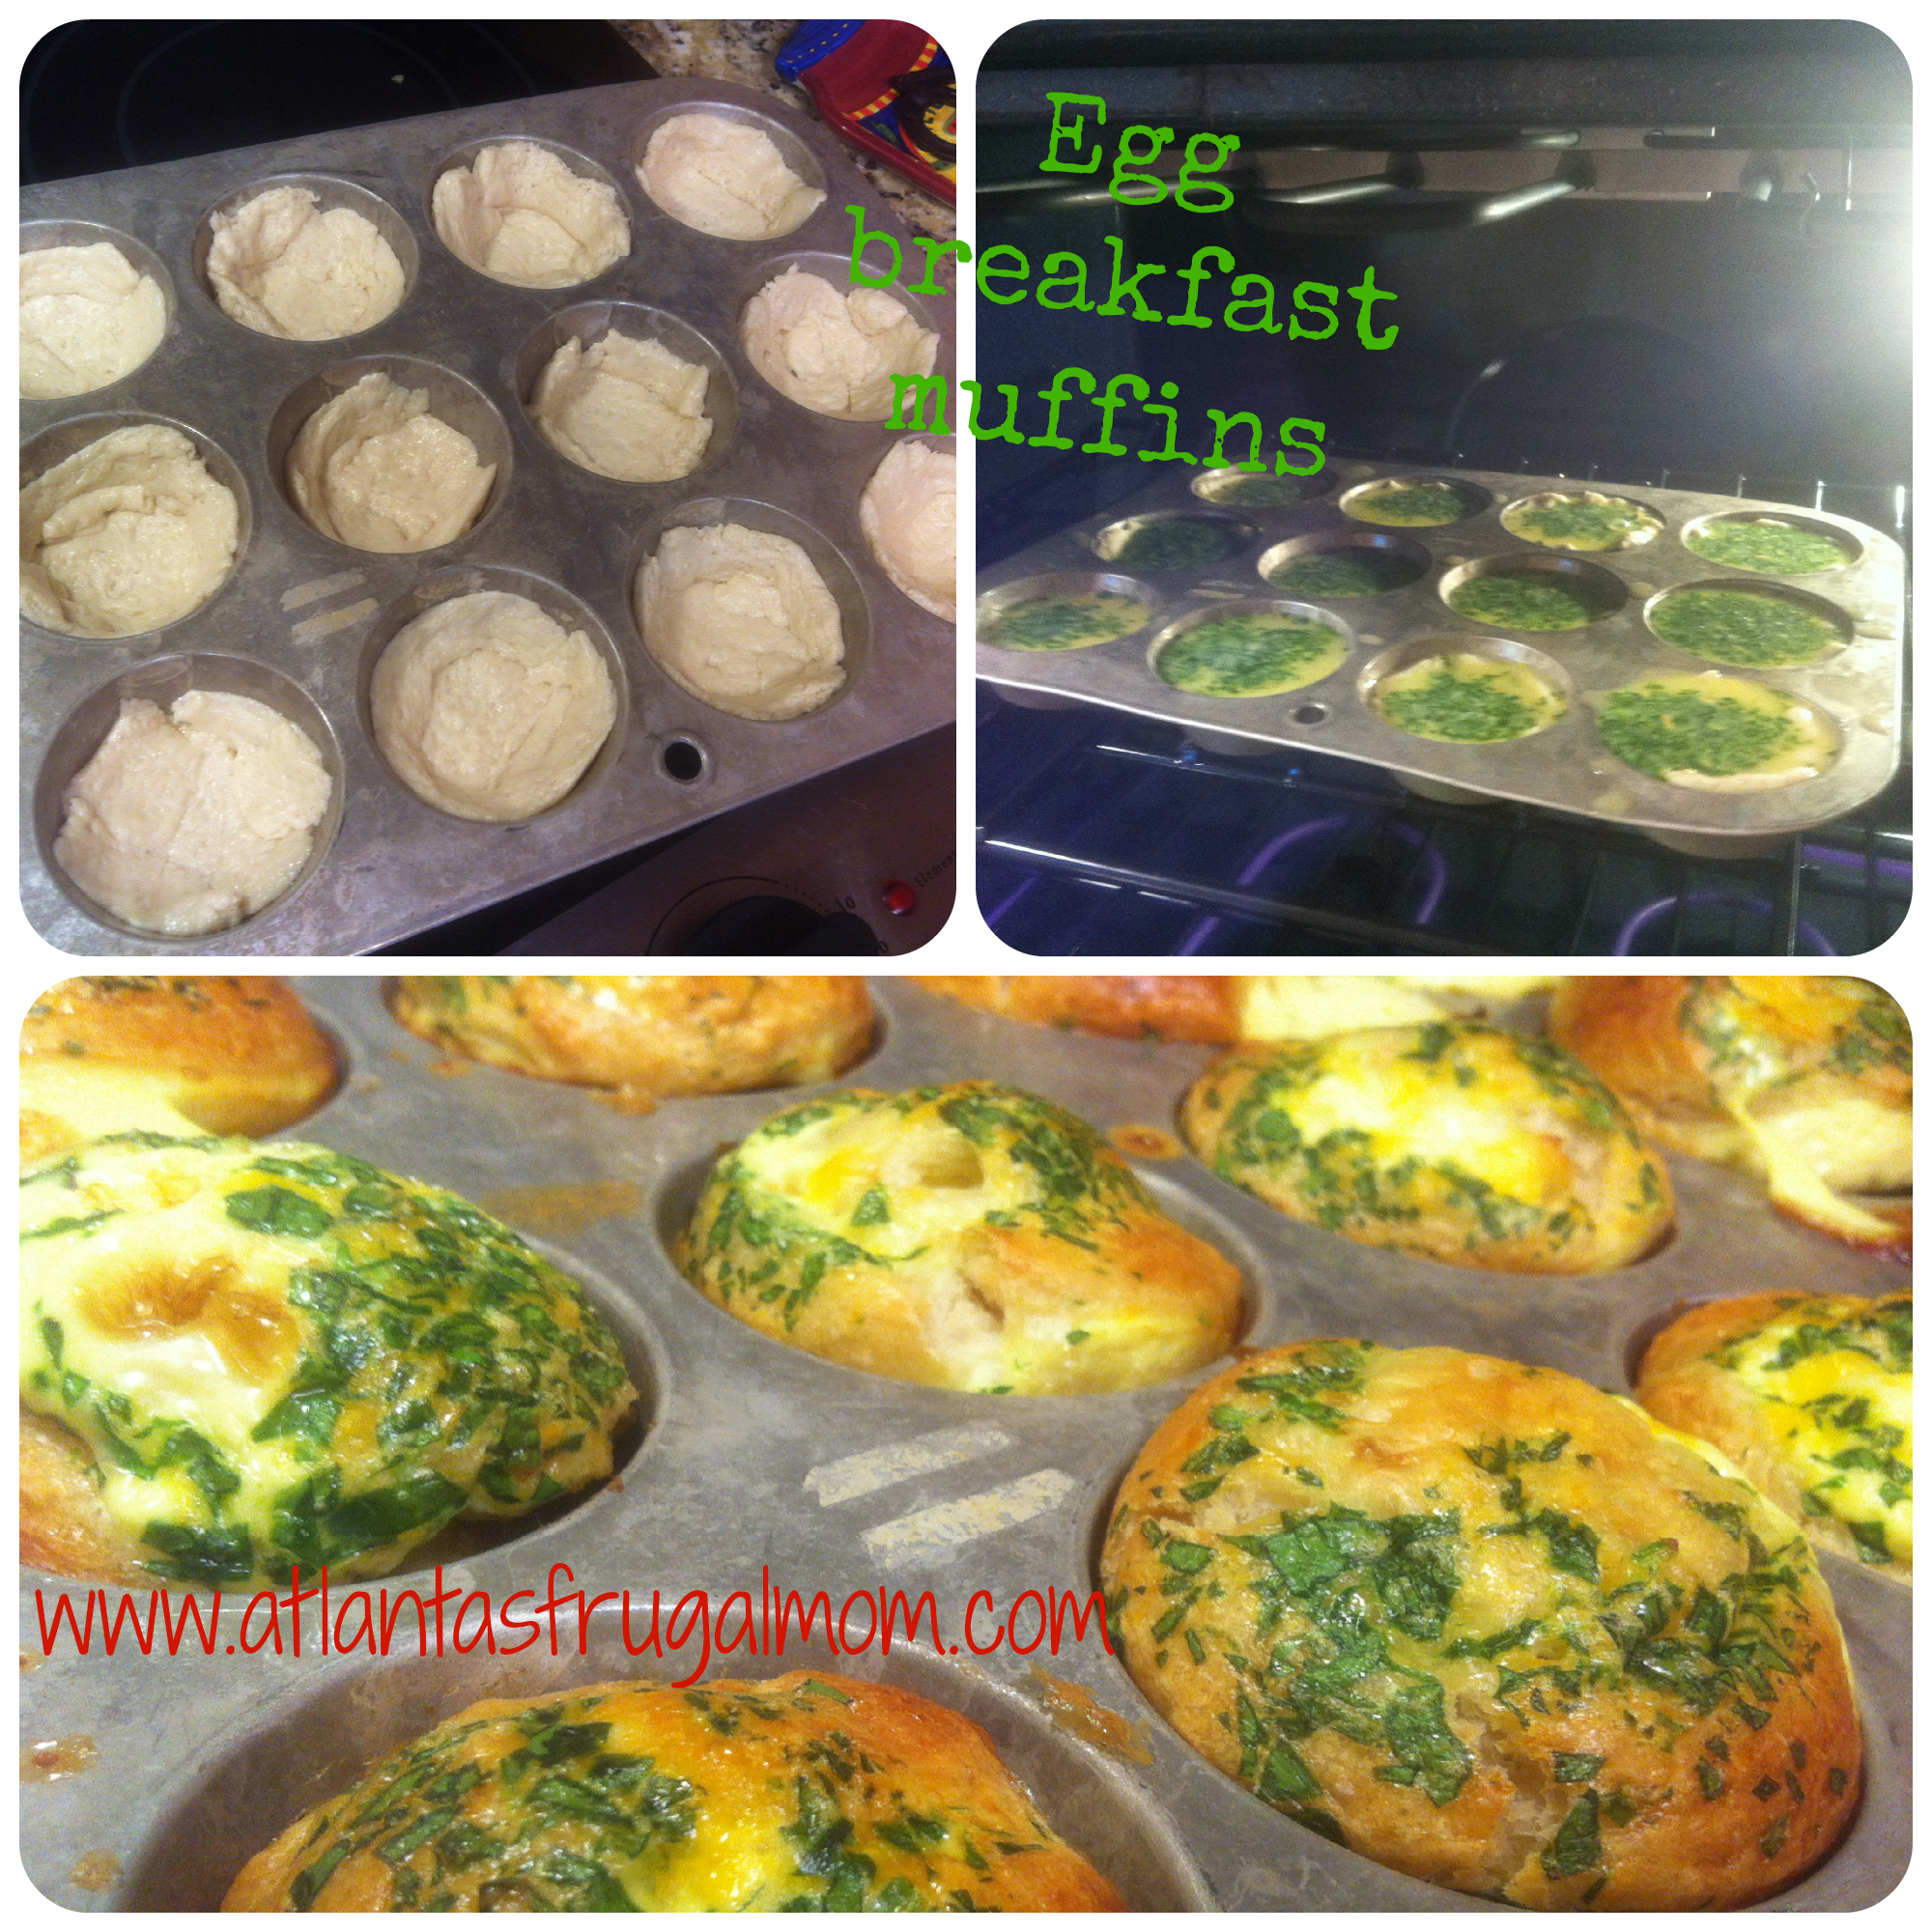
First, my flubs: I learned that there’s a reason refrigerated biscuit dough has an expiration date! lol So, I improvised and used breadstick dough instead — with delicious results!  Second, I did not brown the potatoes beforehand for the frittatas, and they came out a little mushy; still tasty overall, but I would prefer a little more frittata-like crunch.

Also, search for coupons for these ingredients here.  (I didn’t link to them because they’ll change too frequently!)  🙂

Ingredients (makes both egg breakfast muffins AND frittata muffins)

  • 1 can refrigerated breadstick dough (or any dough of your choosing)
  • ~ 1 c. frozen diced potatoes (I used potatoes o’Brian, for an extra kick)
  • ~ 12 eggs (I used egg substitute: 3/4 egg whites, 1/4 “regular” egg substitute)
  • ~ 1 c. shredded cheese
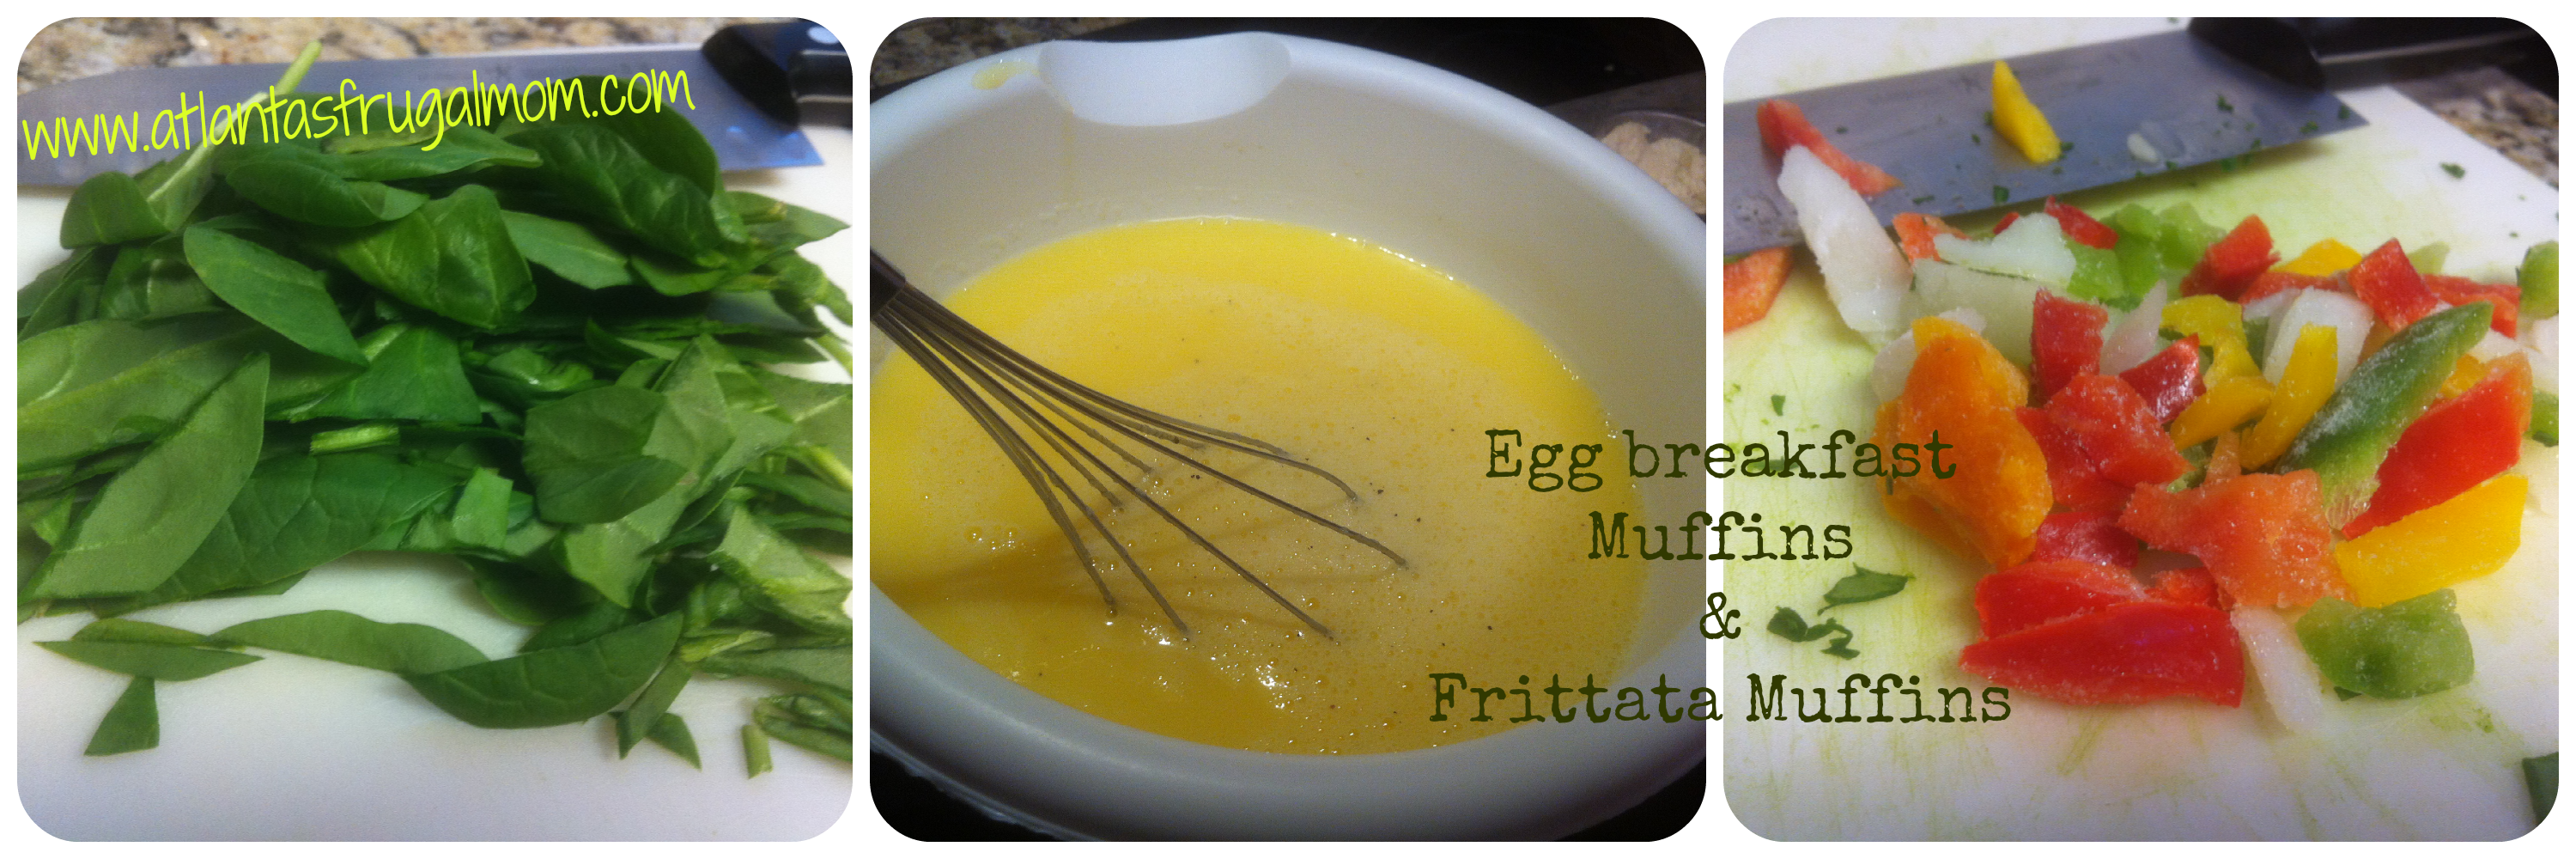
  • 1 c. spinach, finely chopped
  • 1/2 c. frozen onion and three pepper mix
  • salt and pepper, to taste

Egg Breakfast Muffins

Egg Breakfast Muffins:

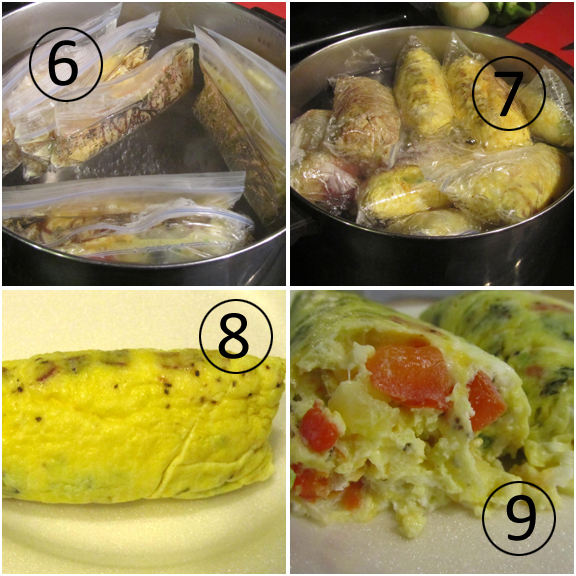
Preheat oven to 450.  Spray muffin tins, and press thin layer of dough in to each spot.  (I just used enough to cover bottom and sides — you’ll have to mold a little bit, and make sure there are no gaps or holes in dough.)  Whisk eggs together in bowl, along with salt and pepper.  Stir in chopped spinach and cheese.  Spoon (or pour) in to muffin tins, about 2/3 full.  Top with additional cheese if desired.  Bake for about 13-15 minutes, until tops are gold and bubbly.


Egg breakfast muffin

Frittata Muffins

Preheat oven to 450. Spray muffin tins, and place a thin layer of potatoes* on bottom of each muffin tin cup. Pour egg mixture, in to each cup, about 2/3 full. Place about 1 tbsp onion and pepper mixture in to each cup. Top with shredded cheese. Bake 17-20 minutes, until tops are gold and bubbly.

* – I did not cook the potatoes beforehand. However, I may opt to brown them in a skillet next time, as I think it’ll add a little more crunch to the muffins.

egg breakfast muffin

Keep on saving!  :o)
--Barbara

**Remember, y'all, this post may contain affiliate links. I receive a small amount of compensation when you purchase from my links, which I"ll totally blow on waffle fries and sweet tea, y'all!**

Easter recipes – Kid friendly bunny cinnamon rolls

**This post may contain affiliate links. I receive a small amount of compensation when you purchase from my links, which I"ll totally blow on waffle fries and sweet tea, y'all!**


Earlier this week I shared a fun Easter recipe for kid friendly Breakfast Easter Baskets.  Another one of the Easter recipes I came up with that we tried out recently was inspired by these Bunny Rolls that I found on Pinterest.  They are so easy to make, and literally only use one ingredient.  I hope you and your family enjoy them as much as my family does!

Easter bunny cinnamon rolls

Easter Bunny Cinnamon Rolls

(Makes 8 bunny rolls)

Ingredients:

1 tube/can cinnamon rolls with icing (that’s it!)

Easter bunny cinnamon rolls

Directions:

1.  Preheat oven to 400.

2. Pop open tube and remove icing packet.

3. Unroll dough into long flat strips.

4. Cut 3 one inch segments from the end of each strip for two ears and a tail.

5. Roll up 2/3 of the remaining dough strip.

6. Starting from the other end of the strip, begin rolling the dough in the opposite direction. (Like an S)

7. Press two 1″ strips onto the smaller round part at the top (the head).

8. Pinch another 1″ strip in half and press it onto the side of the larger bottom part (the body) to make the tail.

9. Place bunny rolls onto a greased baking sheet.

10. Bake for 10-12 minutes until lightly browned.

11. Remove from heat and drizzle with icing before serving.

(For a printer friendly version of this recipe, click here) 

Easter bunny cinnamon rolls

I hope you enjoy this fun Easter recipe, I know we did!  What’s your favorite Easter recipe to share with your family?

Keep on saving!  :o)
--Barbara

**Remember, y'all, this post may contain affiliate links. I receive a small amount of compensation when you purchase from my links, which I"ll totally blow on waffle fries and sweet tea, y'all!**

Easter recipes – Kid friendly ham and egg breakfast baskets

**This post may contain affiliate links. I receive a small amount of compensation when you purchase from my links, which I"ll totally blow on waffle fries and sweet tea, y'all!**


One of our family traditions is to have a big, fun breakfast or brunch on special holidays.  This year I decided it would be fun to come up with two twists on recipes I have seen on Pinterest recently, Ham Egg Bowls and Bunny Rolls.  When I surprised the kids with my recipe ideas, they were ready to try them out right away!  We did a quick trial run today so we could share with all of you before Easter gets here.  The first of the two Easter recipes is below, we hope you enjoy!

Breakfast Easter Baskets

Breakfast Easter Baskets

(makes 12 baskets)

Ingredients:

12 pieces of sliced ham (in circles)

8 eggs

6 Tbsp shredded cheese

2 cups raw spinach (loosely packed)

12 slices of precooked bacon

1/8 tsp salt

Pinch of pepper

Breakfast Easter Baskets

Directions:

1. Preheat oven to 400.

2. Line muffin tin with paper or silicone liners.

3. Press ham circles into tin.

4. Whisk eggs well.

5. Tear spinach into smaller pieces.

6. Combine eggs, spinach, cheese, salt and pepper. Mix well.

7. Pour into ham cups.

8. Bend bacon into a U-shape and place end into egg mixture like handles.

9. Roll up aluminum foil into a stick shape and slide underneath rows of bacon handles to keep shape.

10. Bake for 12-15 minutes until egg is cooked completely.

11. Remove from heat, slide foil from under bacon and serve.

(For a printer friendly version of this recipe, click here)

Breakfast Easter Baskets

I hope you enjoy this fun Easter recipe, I know we did!  Be sure to check out my Easter Bunny Cinnamon Roll recipe too! What’s your favorite Easter recipe to share with your family?

Keep on saving!  :o)
--Barbara

**Remember, y'all, this post may contain affiliate links. I receive a small amount of compensation when you purchase from my links, which I"ll totally blow on waffle fries and sweet tea, y'all!**

Molten lava cake (from a box mix!)

**This post may contain affiliate links. I receive a small amount of compensation when you purchase from my links, which I"ll totally blow on waffle fries and sweet tea, y'all!**


We’ve all been to restaurants that offer those delicious looking molten lava chocolate cakes on the dessert menu. They look amazing, but frankly I am a little too cheap to order dessert out after having dinner. When I saw this mix on clearance at Aldi, I immediately grabbed it because I knew my family would really enjoy it.

Molten Lava cake from a box

I expected to find some sort of chocolate truffle balls in the mix that go in the middle of the cakes, so I was surprised when we open it up and found nothing but a bag of cake mix. At that point, I was a little skeptical of how exactly they were going to turn out. But we all love chocolate, so we dug right in anyway, lol!

(By the way, I’m not listing ingredients and measurements because this is a box mix, and each one is different.  I don’t want to give you directions that are different from the ones on the box you may purchase.)

Molten Lava Cake - From a box!

This was one of the simplest mixes I have ever seen.  It only required eggs and butter, and of course the bag mix.  Instead of using ramekins, we used the muffin tin we had.  The recipe called for us to oil the tin first, but I chose to use Cake Release that I had on hand.  If you haven’t ever used Cake Release, it is AMAZING!  You can literally just dump the cake right out of the pan after baking.  Be sure to use it liberally, or your cake will stick. It has the consistency of a soft butter, not quite as thin as oil.  You should be able to find it at any grocery store or specialty baking shop for under $3.00.

Cake Release - It's like magic!

The directions are pretty easy.  Whisk the eggs, melt the butter, and slowly mix the two together.  Then add in the bag mix and stir until mixed completely (don’t beat).  Then pour into the greased pan and pop it in the oven.  That’s it!

Molten Lava Cake - From a box!

The key to making these molten lava mini cakes is to cook them until the tops are just barely done.  The middle ends up being soft and runny, but the heat is enough to cook the eggs inside, so don’t worry about that.

Flip the cakes out of the pan and serve them upside down.  I dusted these with powdered sugar to add a nice touch at the end.  When you cut into the cake with a fork, you can see the yummy chocolaty center.

Molten Lava Cake - From a box!

Doesn’t it look divine?  I was so impressed that this bit of deliciousness came from a box mix, and only took a few minutes to throw together.  And the best part of making these cakes?  Licking the bowl, of course! 🙂

The best part of making cake ;)

Have you ever made a molten lava cake from a box mix?  What’s your favorite cake to make from a box?

Keep on saving!  :o)
--Barbara

**Remember, y'all, this post may contain affiliate links. I receive a small amount of compensation when you purchase from my links, which I"ll totally blow on waffle fries and sweet tea, y'all!**

Macaroni and Cheese Recipe – Restaurant Style

**This post may contain affiliate links. I receive a small amount of compensation when you purchase from my links, which I"ll totally blow on waffle fries and sweet tea, y'all!**


Macaroni and cheese is one of my favorite dishes.  Not the fake version that comes in the blue box, but the real deal.  My mother made it from scratch when I was a child, and now I do the same for my family.  Often times I’ll just make it with American cheese and a little bit of butter and milk, but lately I’ve been playing around with richer, creamier versions.  Multiple cheeses, heavy cream, and even a pinch of cayenne can take this simple comfort food to an entirely new level.  My newest recipe (which I’m sharing today) has quickly become a favorite in our home.  A layer of seasoned breadcrumbs and a few minutes in the broiler gives it a lightly crispy topping that is a perfect compliment to the delicious, creamy sauce.  The result is a delicious dish that is similar to one you would get at a restaurant!  (For more make-at-home restaurant style dishes, check out this post with 10 of my favorite copycat recipes!)

Restaurant style macaroni and cheese


Restaurant Style Macaroni and Cheese

Ingredients:

6 cups water

2 cups elbow noodles

1 Tbs butter, unsalted

3/4 c milk

3/4 c shredded Colby and Monterey Jack cheese

3/4 c shredded Italian style cheese

1/4 tsp garlic powder

1/8 tsp pepper

1/2 tsp salt

Pinch of cayenne

1/2 c Parmesan herb panko bread crumbs (Private Selection from Kroger)

Restaurant style macaroni and cheese

Directions:

1.  Bring water to a boil on high heat.

2.  Add in noodles and boil for 8-10 minutes.

3.  Remove from heat and drain in a colander. Set aside.

4.  Set oven to high broil.

5.  Melt butter in pot on medium heat.

6.  Add in milk, cheese, and spices.  Whisk until melted completely.

7.  Fold in elbow noodles, stirring gently to coat with sauce.

8.  Pour noodles into oven safe dish.

9.  Top with panko bread crumbs.

10.  Place in oven for 2 minutes until top is browned.

11.  Remove from oven and serve immediately.

Printer friendly recipe for Restaurant Style Macaroni and Cheese

Restaurant style macaroni and cheese

Do you have a macaroni and cheese recipe that’s a family favorite?  I’d love to hear your version, please take a moment to share in the comments below!

Keep on saving!  :o)
--Barbara

**Remember, y'all, this post may contain affiliate links. I receive a small amount of compensation when you purchase from my links, which I"ll totally blow on waffle fries and sweet tea, y'all!**

Smoky beef and bean chili recipe

**This post may contain affiliate links. I receive a small amount of compensation when you purchase from my links, which I"ll totally blow on waffle fries and sweet tea, y'all!**


One of my favorite dishes to make is chili.  It’s effortless, great for any season, and it freezes perfectly!  It’s also a great source of protein, and can be very good for you when it’s not coming from a can!  I’ve been making lots of chili over the last month because the hubs won’t stop eating all the frozen stock I put away.  He eats it on everything.  Fries, hot dogs, rice, nachos, potatoes….you name it, he’ll cover it with chili.  Luckily it’s made with ingredients that are simple to find at any grocery store, and I spend about 10 minutes physically preparing it, so it’s not too bad.  Don’t let the longer list of spice ingredients scare you off either.  I promise this spice mix is 1000x times better than what you get in the pack at the store, and it’s wheat and preservative free!

My favorite two ingredients in this chili are the sausage and the smoked paprika.  Something about chili with sausage is just SO much better to me than plain ol’ beef.  Of course, if you don’t eat pork, just switch it out for more beef.  If you aren’t familiar with smoked paprika, it is one of my most favorite spices of all time.  It’s subtle and smoky, and you don’t need too much, but it gives you a delicious finish that would make you swear that the meat in your chili had been cooked on a smoker.  Just don’t go nuts with it, too much smoky flavor can be a bad thing!

Smoky beef and bean chili

The Bizy Mommy’s Best Chili Recipe

Ingredients:

1 Tbs oil
1 onion, diced
1 green pepper, diced
1 lb beef
1 lb sausage (I use mild)
1 can light red kidney beans (drained)
1 can chili beans (I use mild)
1 can crushed tomatoes (28 oz)
2 can diced tomatoes (15 oz)
4 beef bouillion cubes
4 cups water
1.5 Tbs chili powder
1/4 Tbs red pepper flakes
1.5 Tbs onion powder
2 Tbs garlic powder
1 Tbs ground cumin
1 Tbs parsley
3/4 tsp smoked paprika
1/4 tsp pepper
1 Tbs salt

Smoky beef and bean chiliDirections:

1. Heat oil on medium high in a stock pot and add in pepper and onion.  Cook until the onions start to soften.
2. Add in beef and sausage and cook on medium high until browned throughout.
3. Add in all remaining ingredients and bring to a boil, stirring frequently to prevent burning to the bottom.
4. Once boiling, reduce heat to low/med and cover.  Let simmer for at least 2 hours, the longer the better.

(Click here for a printer friendly version of this recipe)

Smoky beef and bean chili

-It’s going to look *really* thin while it’s simmering.  Don’t worry, it thickens up as it cooks and then cools.

-The red pepper flakes give it a tiny bit of heat, but it’s not spicy.  If you don’t do heat, leave that out.  If you love heat, keep on pourin!

-You can sub out 4 c. beef broth for the bouillion cubes and water.

-Smoked paprika *really* gives this a nice finish.  If you can get it, I would really suggest using it!

-This makes about 16-18 cups of chili, so if you don’t need a ton, throw it in the freezer for lazy dinner nights!

-If your slow cooker is big enough, you could definitely simmer the chili in it all day.  I would still cook the peppers, onions, and meat in another pot first though, and then add in everything on medium heat for an hour, and then low heat for another 3-4.

Hope you enjoy our family’s favorite chili recipe!  Let me know what you think!


Keep on saving!  :o)
--Barbara

**Remember, y'all, this post may contain affiliate links. I receive a small amount of compensation when you purchase from my links, which I"ll totally blow on waffle fries and sweet tea, y'all!**

$5.00 No Peek Pot Roast

**This post may contain affiliate links. I receive a small amount of compensation when you purchase from my links, which I"ll totally blow on waffle fries and sweet tea, y'all!**


So I kinda threw my food budget out the window over the holidays, and now we’re playing catch up.  I actually find it rather entertaining, because being short on funds means I have to get really creative with healthy meals that don’t break the bank.  Earlier this week, Lori over at Vann Clan 5 shared a simple no peek beef tips recipe that got me thinking.

I headed out to Aldi to do my shopping and was stoked to find THREE marked down packs of eye of round steak for right at $3.00 each.  I LOVE picking up discounted packs of tough-as-leather-nobody-wants-to-buy-it meat at Walmart and Aldi, because once you slow cook it, it’s tender as can be!  I grabbed some carrots and onions and a few more ingredients and headed home to make some magic.  This is *such* an easy recipe for anyone to make, check out my $5.00 No Peek Pot Roast below!

$5.00 No Peek Pot Roast

$5.oo No Peek Pot Roast

Ingredients:

1 pound of cheap beef (cut into 1/2-1″ cubes) – $3.25

2 cups of chopped carrots (I used 5 medium carrots) – $0.40 [Read more…]

Keep on saving!  :o)
--Barbara

**Remember, y'all, this post may contain affiliate links. I receive a small amount of compensation when you purchase from my links, which I"ll totally blow on waffle fries and sweet tea, y'all!**

Cooking with the kids: Chocolate Peppermint Popcorn

**This post may contain affiliate links. I receive a small amount of compensation when you purchase from my links, which I"ll totally blow on waffle fries and sweet tea, y'all!**


Today while doing last minute stocking stuffer shopping, I grabbed a bag of Kraft peppermint marshmallows.  My kids love marshmallows, and I thought the peppermint ones would be really tasty in their Christmas morning cocoa.  Once I got home, Angel saw there was a recipe on the back and asked if she could make it for everyone.  I love letting the kids cook and create in the kitchen, so of course I said sure!

Chocolate Peppermint Popcorn 

Chocolate Peppermint Popcorn

Ingredients:

1/2 tsp salt

12 cups air-popped popcorn (6-8 Tbs kernels)

1/2 cup dark chocolate morsels

1 stick unsalted butter

40 mini peppermint marshmallows

Chocolate Peppermint Popcorn

Directions:

1.  Heat oven to 275.

2.  Add chocolate and butter into a microwaveable bowl and heat for 30 seconds at a time until melted completely.

3.  Stir in marshmallows and heat for 15 seconds at a time until melted.

4.  Stir in salt.

5.  Pour over popcorn and toss until coated.

6.  Spread out on a greased baking sheet.

7.  Bake for 10 minutes, stir and bake for another 10 minutes until crisp.

8.  Enjoy!

Chocolate Peppermint Popcorn

This would make a great treat for a party, or a gift for someone special on your list.  Adding in extra marshmallows after the mix cools can give it some extra color and texture.  The original recipe called for semi-sweet chocolate, but we are big dark chocolate fans over here, so we used that instead.  If I hadn’t used all of our mint flavoring on fudge this week, I would have added in a bit more to the chocolate mix, as it wasn’t *quite* as minty as we would have liked.  Still delicious overall though!

Keep on saving!  :o)
--Barbara

**Remember, y'all, this post may contain affiliate links. I receive a small amount of compensation when you purchase from my links, which I"ll totally blow on waffle fries and sweet tea, y'all!**

Omelets in a bag – Cooking with the kids

**This post may contain affiliate links. I receive a small amount of compensation when you purchase from my links, which I"ll totally blow on waffle fries and sweet tea, y'all!**


My friend Nancy (she’s an artist, check out her stuffs y’all!) sent me a link to a post about omelets in a bag recently.  I can’t believe I had never heard of them before!

Each weekend that I have a day off from events, I try to plan a hands on breakfast that I can make with my kids.  We love omelets, but it’s hard to make 8 of them at once and still manage to eat all together.  I always have two pans going, but even so, by the time I finish cooking, the first two batches have already been gobbled up.  This method allows the kids to customize their own breakfast, and everything can be cooked all at once.  (For another delicious breakfast recipe that’s easy to make with the kids, check out my Biscuit Breakfast Bake post!)

Omelets in a bagOmelets in a bag

Directions:

1. Set out your ingredients.

2. Write everyone’s name on a bag (permanent marker).

3. Let everyone pick out their own ingredients.

4. Add a ladle of egg to each bag.

5. Double check everyone’s bags to make sure they are sealed all the way. (watery eggs, yuck!)

This time, I chopped up a wide variety of ingredients.  The kids were able to choose from peppers, onions, olives, tomatoes, peppers, cheese, apples, bacon, and more.  For seasonings, I set out cinnamon, honey, garlic powder, onion powder, jelly, pepper, and salt.  Cracking eggs can get a little messy with kids, so I did that part for them before portioning the eggs into the bags.

Omelets in a bag

6.   Put the bags into a large pot of water.  Bring to a boil.

7.  Cook for about 10 minutes, you’ll be able to see when the eggs are finished cooking.

8.  Open the bags and remove the omelets.  They should just slide right out. (No grease, oil, or butter needed!)

9.  Enjoy!

Omelets in a bag

Not only is this a quick way to prepare omelets, but it takes the caked-on egg skillets out of the equation!  My kids loved that they could choose exactly what they wanted in their omelets.  Allowing children to make their own choices about small things helps to build their confidence, and teaches them about independence.  Plus, it’s a lesson in consequences as well.  If they refuse to listen to mom and instead put in 6 Tbs of jelly and 2 Tbs of salt into their eggs, they’ll learn really quick that maybe they should have paid attention, and you won’t even have to nag!

I may be busy a lot of the time with business, but weekend breakfast with my kids is a moment I treasure.  We get a chance to talk about school, friends, their activities, and more.  It’s such a great way to start the day!  And now with this easy bagged method, we can all eat at the same time on omelet day!

(BTW, if you are a camper, this is an excellent way to cook eggs at a campsite!)

Want to make this meal even easier?  Check out some of my favorite time saving kitchen tools below!

1.  Double balloon whisk – Mine is from when I was a Pampered Chef consultant, but any brand will do.  They work so much better than a traditional whisk, and really beat things up pretty quickly.  Twice the wires means half the work time! (Be sure to use the end of the whisk to “pop” the yolks first, they’ll mix up much faster that way.)

2.  Food chopper – Another thing I had from Pampered Chef days, a food chopper really saves times on chopping up ingredients, and you can get the exact type of chop you desire, from rough to extremely fine.

3. Mini ladles – My favorite is the one ounce size.  We have a variety of ladles, but this one is the most versatile.  Works great for ladling eggs in this case, but it’s also perfect for gravy, dessert sauces, and more.  Using those huge soup ladles just doesn’t cut it sometimes!

*This post includes affiliate links, and I earn a small commission from any items purchasedMaybe even enough to take my kids out for ice cream. Or buy myself a cheap bottle of wine!*

Have you ever tried to cook eggs in a bag?  What’s your favorite way to eat your omelet?  Share your favorite recipe in the comments below!

Keep on saving!  :o)
--Barbara

**Remember, y'all, this post may contain affiliate links. I receive a small amount of compensation when you purchase from my links, which I"ll totally blow on waffle fries and sweet tea, y'all!**

Quick and Easy Salad Dressing

**This post may contain affiliate links. I receive a small amount of compensation when you purchase from my links, which I"ll totally blow on waffle fries and sweet tea, y'all!**


This dressing has become one of our favorites, and it’s so easy to make!  It’s much healthier than any of the store bought dressings available, and can be thrown together in a matter of seconds.  If you want to double or triple the recipe, it keeps just fine in the fridge.

easy salad dressing

Quick and Easy Salad Dressing

Ingredients:

Juice of one lemon

1/4 c. olive oil

1/2 tsp garlic powder

1/2 tsp kosher salt

1/4 tsp coarse ground black pepper

Whisk all ingredients together and serve immediately over mixed greens.


Variations:

-Add red pepper flakes for a little bit of spice

-Use half lemon and half orange juice

-Add minced red onion

-Mix in 1/2 tsp of Italian seasoning


Do you make your own salad dressing?  What’s your favorite recipe?

Keep on saving!  :o)
--Barbara

**Remember, y'all, this post may contain affiliate links. I receive a small amount of compensation when you purchase from my links, which I"ll totally blow on waffle fries and sweet tea, y'all!**

Atlanta's Frugal Mom is a participant in the Amazon Services LLC Associates Program, an affiliate advertising program designed to provide a means for sites to earn advertising fees by advertising and linking to Amazon. In other words, if you click through to Amazon from some of the books or products I recommend and make a purchase, I get a small percentage in exchange for your purchase. It's a small way you can support AFM.