Red White and Blue Pinwheel Recipe

**This post may contain affiliate links. I receive a small amount of compensation when you purchase from my links, which I"ll totally blow on waffle fries and sweet tea, y'all!**


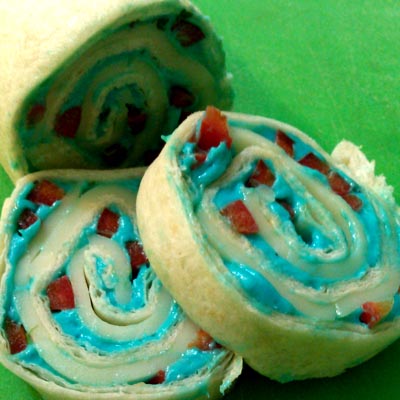
This red, white, and blue pinwheel recipe is the perfect addition to your 4th of July get together!  It’s simple and quick, and looks adorable when it’s all finished and cut up for serving.  Don’t worry, it doesn’t taste “blue” either, there’s ranch mixed in there!

Red white and blue recipes | Pinwheels

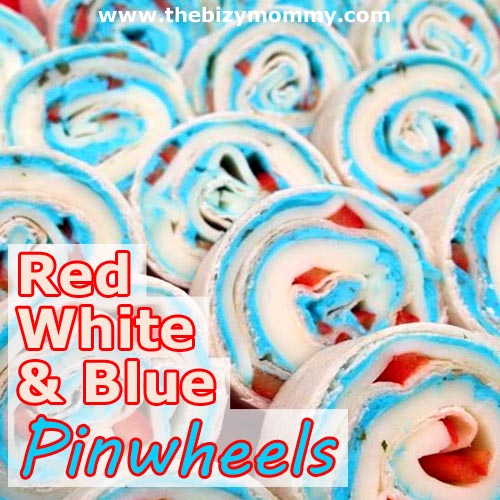
Red White and Blue Pinwheels
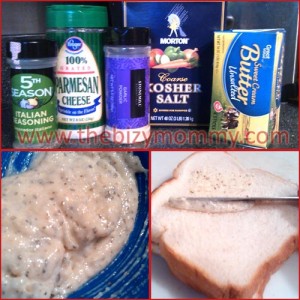
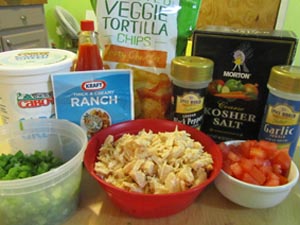
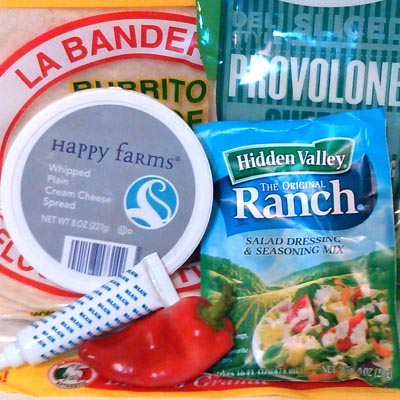
Ingredients:
3 large flour tortillas
8 oz tub of whipped cream cheese
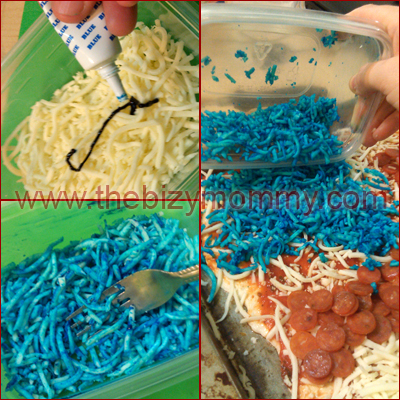
Blue food coloring
1 packet ranch dip/dressing mix
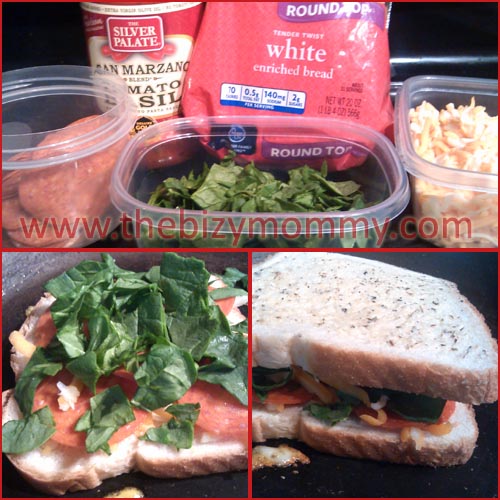
1 pack sliced provolone (or any other white cheese)
1 small sweet red pepper
Plastic wrap

Red white and blue recipes | Pinwheels

This recipe does have blue food coloring in it, so if you try to stay away from food dyes you’ll want to check out an alternative like India Tree Natural Decorating Colours.

Directions:
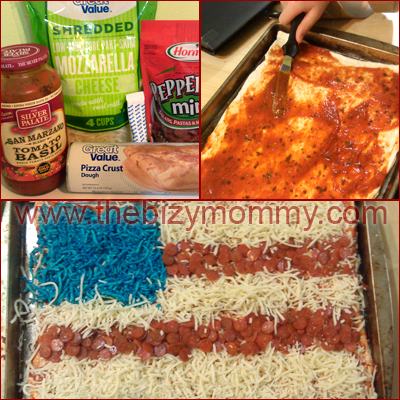
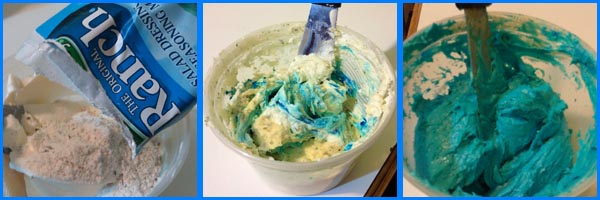
1.  Pour the ranch packet into the cream cheese, mix well.
2.  Squeeze blue food coloring into cream cheese, stir until desired color.
3.  Spread cream cheese across tortillas.
4.  Cover each tortilla with 4 pieces of cheese.
5.  Cut pepper into thin strips and lay out across the top of the cheese.
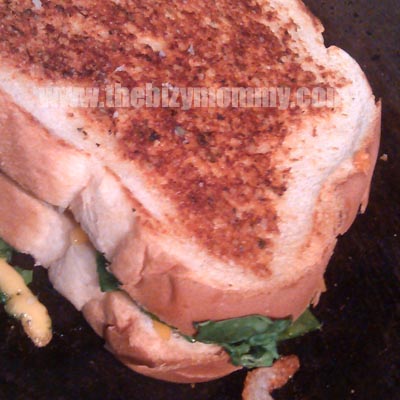
6.  Tightly roll up each tortilla.
7.  Wrap each tortilla in plastic wrap and chill for at least 3o minutes.
8.  Remove plastic wrap from chilled tortillas and slice before serving.

Red, White & Blue Pinwheels printer friendly recipe

Red white and blue recipes | Pinwheels


Red white and blue recipes | Pinwheels

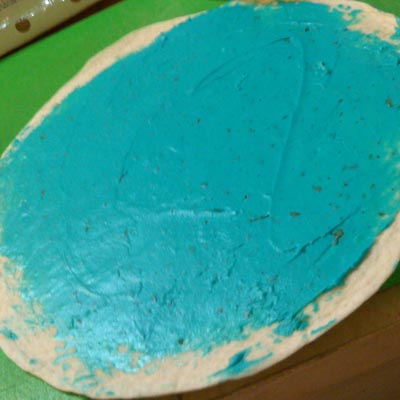
Spread the cream cheese across the tortillas

Red white and blue recipes | Pinwheels

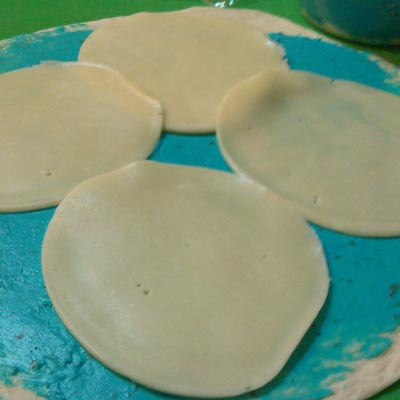
Top the cream cheese with provolone

Red white and blue recipes | Pinwheels

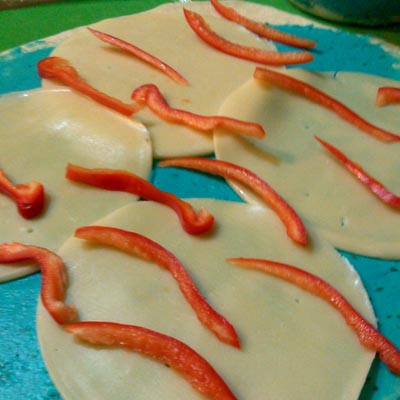
Top the cheese with sliced peppers

Red white and blue recipes | Pinwheels

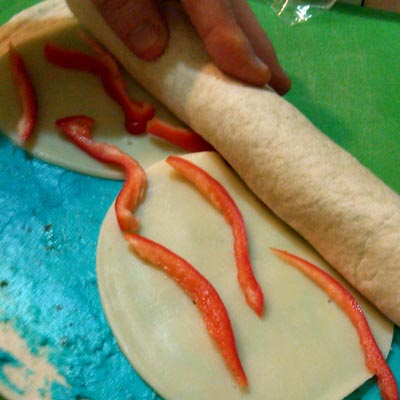
Tightly roll the tortillas


Red white and blue recipes | Pinwheels

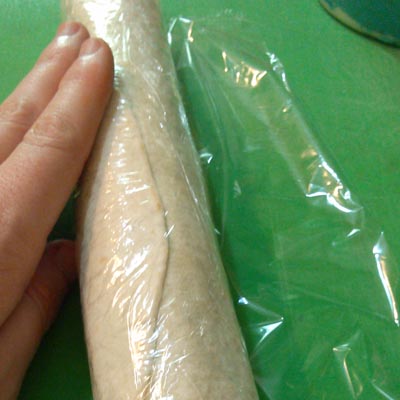
Wrap each rolled tortilla with plastic wrap

Red white and blue recipes | Pinwheels

Chill wrapped tortillas for 30 minutes then unwrap and slice

***FRUIT VERSION – If you want more of a dessert pinwheel, you can trade out the ranch mix for a half teaspoon of clear vanilla extract, and use sliced strawberries instead of the peppers.  Yummy!
These pinwheels can be a tiny bit difficult to roll, as you want to make sure they are REALLY tight, so that they stay together when you slice them.  Other than that, it’s a cute finger food that’s perfect for holiday get togethers.  You could even change up the colors, doing green instead of blue for Christmas, or orange peppers and black coloring for Halloween!

Don’t forget to pin this patriotic pinwheel recipe for later, and be sure to share your pictures with me when you make it!

Red white and blue recipes

Keep on saving!  :o)
--Barbara

**Remember, y'all, this post may contain affiliate links. I receive a small amount of compensation when you purchase from my links, which I"ll totally blow on waffle fries and sweet tea, y'all!**

Red, white and blue punch recipe – Great for kids!

**This post may contain affiliate links. I receive a small amount of compensation when you purchase from my links, which I"ll totally blow on waffle fries and sweet tea, y'all!**


I’ve been sharing some of our favorite red, white, and blue recipes this month, and today’s post is a fun multi-colored punch that is perfect for the upcoming 4th of July holiday. It’s easy to make, yummy to drink, and sure to delight your littles.  You can even use it as a mini science lesson while you’re at it!

Red White and Blue layered party punch | Great for kids

Red, White and Blue Punch

Ingredients:Red White and Blue layered party punch | Great for kids

Cranberry Juice Cocktail

Blueberry Pomegranate G2 Gatorade

Mandarin Orange Clear American Zero


Directions:

1.  Pour about an inch of cranberry into the bottom of a clear glass.

2.  Fill with ice to the top.

3.  Slowly pour in the Gatorade until the glass is 2/3 full.

4.  Top off with clear soda.

5.  Let it sit for about 5 minutes before serving to make sure the different drinks have time to fully separate.

6.  Blow your kids away with your magic drink skills!


How it works:

Liquids will separate based on their sugar content.  Those with the highest concentration of sugar will sink to the bottom, whereas those with no sugar (or a sugar alternative like Splenda or Stevia) will end up on top.  You really don’t have to use the specific drinks I mentioned above in the ingredients, you just need to make sure that you have one with a high sugar content, one with low sugar, and one with little to no sugar.  But if you don’t want to run around the store comparing nutrition labels, just use the ones I listed above.  We typically don’t do any sort of high sugar drinks at all in our house (or those with fake sugars) but I made an exception for these because they are so cool looking.

Red White and Blue layered party punch | Great for kids

Want to make these drinks even more spectacular?  Top them off with a cherry and a skewer of blueberries and a cute straw!  Be sure you use a clear cup or glass, otherwise you won’t be able to see the colors, lol!

Red White and Blue layered party punch | Great for kids

Red white and blue recipes

Keep on saving!  :o)
--Barbara

**Remember, y'all, this post may contain affiliate links. I receive a small amount of compensation when you purchase from my links, which I"ll totally blow on waffle fries and sweet tea, y'all!**

Red, white and blue cupcakes in just 2 steps!

**This post may contain affiliate links. I receive a small amount of compensation when you purchase from my links, which I"ll totally blow on waffle fries and sweet tea, y'all!**


These cute red, white, and blue cupcakes are perfect for patriotic holidays like the 4th of July. Not only are they adorable and delicious, but they are also really easy to make!  Keep reading to find the secret behind these tasty treats!

Two step Red White and Blue cupcakes| Great for kids

Did y’all know just a few years ago I was big into baking?  I mean, I baked ALL KINDS of stuff.  Cupcakes, cakes, cake balls (before they got popular, dangit!), the list just goes on and on.  See, I’m good at that sort of thing but I don’t have the heart and passion for it.  It takes a lot of work, and tons of patience, and I’m just not up for doing that every day any more.  But the kiddos still want treats somedays, we still have get togethers to attend, which means I had to come up with something awesome but easy.  So today I’m sharing my super secret, 2 step recipe for red, white, and blue cupcakes that are the perfect dessert for your upcoming 4th of July parties.  Are you ready?  Let’s get started!

Red, White & Blue Cupcakes

Step 1: Buy premade cupcakes with white icing, raspberries, and blueberries.

Two step Red White and Blue cupcakes| Great for kids

Step 2: Arrange the berries on top of the cupcakes.

Two step Red White and Blue cupcakes| Great for kids

Ta-dah!  That’s it!  I know, it’s super lazy easy right?  Look how cute they are, and they literally take seconds to put together.  My 4yo daughter actually made the ones for our party, and she was so proud of herself when she was finished.  She had just as much fun as if we had made them from scratch, but this was faster and a lot less messy!  Just don’t tell on me now, ya hear? 😉

Two step Red White and Blue cupcakes| Great for kids

A few tips:

-You can switch out any red berry for the raspberries, it really doesn’t matter.  You could do strawberries or even cherries!

-Check for discount cupcakes, I know they mark them down the next day at Kroger and Walmart.  I paid about $6.00 for the dozen, but didn’t have to bake or pipe icing on, woohoo!

-Make sure all your blueberries are facing the same way, or they won’t look nearly as cutesy.

Be sure to check out my American Flag Pizza recipe, it’s kid friendly and fits in perfectly with the patriotic party food theme!

Keep on saving!  :o)
--Barbara

**Remember, y'all, this post may contain affiliate links. I receive a small amount of compensation when you purchase from my links, which I"ll totally blow on waffle fries and sweet tea, y'all!**

5 ways to save money with Family Mobile unlimited plans

**This post may contain affiliate links. I receive a small amount of compensation when you purchase from my links, which I"ll totally blow on waffle fries and sweet tea, y'all!**


I am currently trying out a new cheap wireless plan as part of a compensated project for Collective Bias®. This article shares my experience and thoughts about the new Family Mobile unlimited plans.

It’s been a month since I switched over to Walmart Family Mobile’s unlimited plan, and I wanted to check back in and give you guys an update.  I already told you all about their reasonably priced phone selection and how easy it was to activate my service so I won’t waste your time by repeating myself.  Instead I’ll be sharing my experience with using their service, and 5 ways my Family Mobile plan is helping me save money.

Saving my family money with Walmart Family Mobile

Family Mobile unlimited plans are great for big families like ours!

I have to tell you, I have been really pleased with my service overall.  The low price rate plan is great for my family’s budget, their customer service has been wonderful, and I have better coverage than I did when I was with Boost Mobile.  Oh, and I love my awesome new smartphone too!

Saving money with Walmart Family Mobile

I’m pretty excited about my new phone, can you tell? 😉

One thing I heard several times from you guys was that you needed more than 1GB of data each month.  Something Walmart Family Mobile can definitely improve on is explaining their data services better.  As you can see in the picture below, you DO have unlimited data, but the first 1GB each month is considered “Speed Boost” data, meaning it’s much faster.  (Why it says 250MB, I have no clue)  

If you exceed 1GB, then your speed will be slowed down, but you can still use all the data you want for no additional fee.  If you have a need for speed (hahaha!), you do have the option of adding on more of that faster data each month.

Saving money with Walmart Family Mobile

I blew through that first gig pretty fast, as I am a heavy data user.  As in all. day. long.  How else am I supposed to pin all the things, and watch all the things, and share all the things?!  Yes, I have noticed that speeds are a tiny bit slower now, but not enough to really make a difference or get on my nerves.  Especially when I can use all the data I want!

Saving money with Walmart Family Mobile

As far as coverage is concerned, from what I initially saw on the Walmart Family Mobile maps, things looked pretty great compared to my old service.  Now that I’ve used the service for a month, I can say that I really do think the coverage is better.  I can use my phone in areas that I didn’t have service in before, like at my in laws house.  I also don’t randomly lose service like I was doing before.

The really big test will be later this month when we make a trip down to south Georgia. Some of those areas are REALLY rural and have no service period, by any providers.  From the maps on the Family Mobile site, it looks like we should have coverage the entire trip, so I’m pretty sure I won’t be disappointed.

Saving money with Walmart Family Mobile

Another thing I really like about my new phone plan is the great customer service I have received.  When I called to port over my old number, everyone I spoke with was very polite and helpful.  When I had a question about my bill, again, everyone was super nice.  That seems to be unusual with cell phone providers these days, so I was honestly pretty surprised.

The account management section of their site is very easy to navigate, so paying my bill or making changes to my plan is quick and easy.  I also like that they send me texts to remind me when my bill is due, as well as the receipt and confirmation number once a payment is made.  I hate having to print our receipts and save emails or write down confirmation numbers, I always lose them!  This way I have it right in my phone, ready to access, just in case there is a problem.

Saving money with Walmart Family Mobile

This makes me happy, it’s one less thing I have to remember to do!

The only complaint I have about the myTouch smartphone I am using is that there aren’t very many cases to choose from. As someone that has a tendency to drop things rather frequently, I like to have extra protection for my electronics.  While I was a little bummed about the lack of selection, I am still more than pleased with the phone and service overall.

So now that I’ve told you what I like and dislike about my new smartphone and Family Mobile unlimited plan, I’d like to share with you some ways that I am saving money by using their service.  It’s not just from the monthly bill, there are quite a few other things too!

5 ways to save money with Walmart Family Mobile

1.  Comparison shopping on-the-go – With the use of a smartphone and my unlimited data, I can compare prices while I’m out shopping.  I can be in the aisle at Walmart, checking the price at Kroger, Kmart, Amazon, etc. to make sure I get the best price.  Many stores will price match now if their competitor is offering a better deal.  Or, if I find a way better deal on Amazon, I can go ahead and use my one-click ordering and buy it right then!  Without an unlimited data plan, that’s not really an option for savvy shoppers like myself.

2.  No late/reconnect fees for not paying bill on time – If I forget to pay my bill, my phone may be turned off, but I don’t have to pay late fines or reconnect fees to turn it back on.  I just have to pay my bill.  And that’s not even an issue anymore, because I get texts to my phone to remind me to pay each month!  I am the worst about forgetting to pay things, and always end up paying extra because of that.  (And let’s not even get started on library fines, eek!)

3.  Money saving apps like Scoutmob and Gas Buddy – Just like with the comparison shopping on-the-go, I can also find the best deals on gas nearby, or for a bite to eat, all with different apps I can download for free from Google Play.  Unlimited data lets me search for those deals close by, without having to worry about going over my limit and getting stuck with big overage fees.

4.  Cheaper home internet service – With a limited data plan, you can still get online as long as you are using wifi.  Most people just use their home wifi and save their data for when they are on the go.  That really slows down the speed if you have multiple people connected, and then you end up paying more for upgraded home internet that can accommodate everyone’s wifi needs.  With the unlimited data, you don’t have to connect via wifi ever again, and can use a less expensive plan for home instead!

5.  Unlimited plan for a low monthly fee – I took a moment to check out the pricing for a similar phone and plan with AT&T since they are one of the most popular companies today.  Most people go with a 2 year contract to get the free phone, so I decided to base the numbers off that.  Check it out:

AT&T vs Family Mobile cost comparison

AT&T is almost 3x more than Family Mobile’s unlimited plan!  That’s a pretty huge difference, wouldn’t you agree?  And there are no early termination fees with Family Mobile, because it’s a month-to-month service with no contract.

So what do you think, are you ready to give Walmart Family Mobile a try?  You can set everything up online in minutes, or you can do it in person at pretty much any Walmart Supercenter.  It took me less than 10 minutes to grab my activation kit and have my phone turned on when I visited my local Walmart last month.

Could you use more money in your pocket every month?

Are you overpaying for a limited wireless plan?

Keep on saving!  :o)
--Barbara

**Remember, y'all, this post may contain affiliate links. I receive a small amount of compensation when you purchase from my links, which I"ll totally blow on waffle fries and sweet tea, y'all!**

American flag pizza recipe

**This post may contain affiliate links. I receive a small amount of compensation when you purchase from my links, which I"ll totally blow on waffle fries and sweet tea, y'all!**


This red, white, and blue American Flag pizza recipe is a fun activity for the whole family! It’s great for a 4th of July get together, or just as part of a special Independence Day themed lunch. We had fun making it, and of course eating it too. This works really well for kids of all ages because it’s super simple to make.

Red White and Blue Party Foods | American Flag Pizza

American Flag Pizza

Ingredients:
Pizza dough
Shredded Italian or mozzarella cheese
Blue food coloring
Mini pepperoni
Spaghetti sauce (I like tomato basil)
Sliced mozzarella balls (optional)

American Flag Pizza

Directions:
1.  Preheat oven to 400 degrees
2.  Spread dough out on a cookie sheet
3.  Cover dough with sauce
4.  Cover with cheese, leaving the top left corner empty
5.  Lay out pepperoni in stripes
6.  Mix blue food coloring with 1 cup of cheese (see pic below)
7. Cover top left corner of pizza with the blue cheese
8. Bake for 13 minutes, remove from oven
9.  Add sliced mozzarella as stars on top of the blue cheese
10. Bake for 4 more minutes to melt star cheese
11. Remove from oven, slice and serve while hot

American Flag Pizza printer friendly recipe

American Flag Pizza

This American flag pizza recipe is so simple, and your kids are sure to enjoy it. If you can find cheese stars, those look even better, but it’s still cool looking without them.  You could also use this same concept to make themed pizzas for other occasions, like Halloween or even Christmas!

Red white and blue recipes

I’ve got several more red, white, and blue recipes that are perfect for your family holiday get together, don’t forget to check them out!

Keep on saving!  :o)
--Barbara

**Remember, y'all, this post may contain affiliate links. I receive a small amount of compensation when you purchase from my links, which I"ll totally blow on waffle fries and sweet tea, y'all!**

Spinach and Pepperoni Grilled Cheese Sandwiches

**This post may contain affiliate links. I receive a small amount of compensation when you purchase from my links, which I"ll totally blow on waffle fries and sweet tea, y'all!**


You guys are in for a treat with this recipe!  It’s a great twist on a classic childhood favorite, grilled cheese sandwiches.  And they are SUPER easy to make too!

My friend Karen over at In the Kitchen with KP shared a picture of her awesome Double Cheese & Pepperoni Grilled Cheese on Facebook today, and I knew I had to make them.  Like right away.  Which worked out perfectly because it was time for lunch and I had just realized we were out of eggs so the egg salad I had planned was a no-go!

I didn’t have everything for her exact recipe, so I had to tweak it a little for what I had in the fridge.  I really wanted to do something with roasted red peppers, but the jar I had in the fridge had gone bad.  Don’t you hate when that happens?  I ended up with pepperoni, raw spinach, a shredded cheese blend, a halfway smashed loaf of white bread, and a jar of tomato basil pasta sauce.  Lol.

spinach and pepperoni grilled cheese sandwiches

Spinach & Pepperoni Grilled Cheese Sandwiches

(makes six sandwiches)

Ingredients:spinach and pepperoni grilled cheese sandwiches

3 Tbs unsalted butter, softened

2 Tbs Parmesan cheese

1 tsp garlic powder

1/2 tsp Italian seasoning

1/4 tsp salt

12 slices of bread

2 cups of cheese

30 slices of pepperoni

2 cups of chopped raw spinach

1 cup of tomato basil pasta sauce

spinach and pepperoni grilled cheese sandwiches

spinach and pepperoni grilled cheese sandwiches

Directions:

1.  Mix together butter, garlic powder, Italian seasoning,

Parmesan, and salt.spinach and pepperoni grilled cheese sandwiches

2.  Heat skillet to medium heat.

3.  Spread butter mix on one side of each bread slice.

4.  Place bread, butter side down, in heated skillet.

5.  Top bread with 2 Tbsp shredded cheese, 5 slices pepperoni,

1/4 cup spinach, and another 2 Tbsp cheese.

6.  Place another piece of bread on top, with buttered side up.

7.  Cook for 30-45 seconds until bread is browned, then flip and

cook for another 30-45 seconds.

8.  Remove from heat and serve with warm pasta sauce for dipping.

Printer-friendly version of Spinach & Pepperoni Grilled Cheese Sandwiches

spinach and pepperoni grilled cheese sandwiches

Thank you again to In the Kitchen with KP for the inspiration for this tasty lunch recipe!

The butter spread really puts this sandwich over the top.  You can switch it up and use bell peppers, onions, tomatoes, any sort of veggies instead or (or along with) the spinach and pepperoni.  You can also use any sort of tomato based sauce for dipping, I just happened to have the tomato basil on hand.  I bet ranch would be really delicious too!

spinach and pepperoni grilled cheese sandwiches

What’s your favorite way to make grilled cheese sandwiches?

Keep on saving!  :o)
--Barbara

**Remember, y'all, this post may contain affiliate links. I receive a small amount of compensation when you purchase from my links, which I"ll totally blow on waffle fries and sweet tea, y'all!**

Twice Baked Breakfast Potatoes

**This post may contain affiliate links. I receive a small amount of compensation when you purchase from my links, which I"ll totally blow on waffle fries and sweet tea, y'all!**


We had family over last week for brunch and I put off planning food until literally an hour before everyone showed up.  I am either to one extreme or the other – planning meals a week in advance, or flying by the seat of my pants.  So I got online that morning and started searching for brunch recipes.  And what did I find?  Quiche.  And more Quiche.  Oh, and quiche.

Don’t get me wrong, I LOVE quiche, but just did not want to make it for brunch.  And also, I didn’t want to go to the store and buy the ingredients. 😉

So I went in the kitchen and did what I do, just started digging through the fridge and grabbing things.  I ended up with potatoes, cheese, 4 eggs, sausage links, and a slightly wrinkly pepper.

Twice baked breakfast potatoes

So what do you make when that’s what you’re working with?  

Twice baked breakfast potatoes, of course!  

These potatoes are pretty simple to make, and they are incredibly delicious.  Plus they seem like they would take a long time, but really they don’t.  (shhhh…..most of the time is just cooking them in the microwave)

Twice baked breakfast potatoes

Twice Baked Breakfast Potatoes

Ingredients:Twice baked breakfast potatoes

5 large potatoes, washed

4 eggs

1 cups cooked sausage (I chopped up links)

1/4 cup chopped bell peppers

1/2 tsp garlic powder

1/2 tsp onion powder

1 tsp parsley

1/2 tsp salt

1/4 tsp pepper

1 cup shredded cheese

Twice baked breakfast potatoes

Directions:

1. Poke holes in potatoes with a fork and cook all together in microwave for 20 minutes.

2. Preheat oven to 400.

3. Mix together eggs, sausage, peppers, and spices.

4. When potatoes are done cooking, cut in half and scoop out the middle.

5. Pour egg and sausage mix into potatoes and top with cheese.

6. Bake at 400 for 15 minutes or until egg is cooked all the way.

Click here for a printer friendly version on Twice Baked Breakfast Potatoes

Twice baked breakfast potatoes 

These are so easy to make, and everyone will love them, trust me!  the hardest part is scooping out the potatoes, and that’s not even difficult.  Just be sure you don’t burn yourself, they will be hot!  And save all the potato scoopings in a container, because you can make them into a small potato salad, add them in to soup, etc.

potato-scoop


Twice baked breakfast potatoes

What’s your favorite family friendly brunch dish?  Share in the comments below!

Keep on saving!  :o)
--Barbara

**Remember, y'all, this post may contain affiliate links. I receive a small amount of compensation when you purchase from my links, which I"ll totally blow on waffle fries and sweet tea, y'all!**

Easy Cajun Jambalaya Recipe

**This post may contain affiliate links. I receive a small amount of compensation when you purchase from my links, which I"ll totally blow on waffle fries and sweet tea, y'all!**


Earlier this month, I received a free voucher for Johnsonville Premium Fully Cooked Dinner Sausages from BzzAgent, and I knew right away what flavor I wanted to try.  They have 5 different varieties, but I am an Andouille fanatic, so that’s what I headed straight for when we got to Kroger.

When I got home, I logged on to AllRecipes.com, one of my favorite sites for cooking inspiration.  Well, you know, besides Pinterest of course! 😉  I found an easy jambalaya recipe that I could start with, but of course I modified it along the way to suit my family’s tastes.

easy cajun jambalaya recipe

Easy Cajun Jambalaya

Ingredients:

1 Tbs olive oil

1 lb Johnsonville Premium Andouille sausage, diced

Girls helping in the kitchen

They like to help in the kitchen, can you tell? 🙂

2 10 oz cans of chicken breast meat, drained

2 onions, diced

2 green bell peppers, diced

3 ribs of celery, diced

1/4 cup minced garlic

1 Tbs onion powder

1 Tbs Cajun seasoning

1/8 tsp cayenne pepper (more if you like it spicy!)

1 tsp salt

1/2 tsp pepper

4 cups of uncooked rice

12 cups of chicken broth (I used water and bouillon cubes)

6 bay leaves

1 1/2 Tbs Worcestershire sauce

1 tsp Texas Pete hot sauce

Easy cajun jambalaya recipe

Directions:

1.  Heat oil in a stock pot over medium high heat.

2.  Saute sausage for five minutes until browned.

3.  Add in chicken, onion, bell pepper, celery, and garlic.

4.  Season with Cajun seasoning, cayenne, onion powder, salt and pepper.

5.  Mix well and cook until onions start to soften.

6.  Add in rice, chicken broth, and bay leaves.

7.  Bring to a boil, then simmer while covered for 20-25 minutes.

8.  Mix in Worcestershire and hot sauce.

9.  Remove bay leaves and serve.

Printer friendly version of this Easy Cajun Jambalaya recipe

easy cajun jambalaya recipe

This isn’t a traditional version, but it sure is tasty!  Have you tried to make jambalaya at home before?

I received a voucher for free product from Johnsonville and BzzAgent but this recipe and all opinions expressed are my own.


Keep on saving!  :o)
--Barbara

**Remember, y'all, this post may contain affiliate links. I receive a small amount of compensation when you purchase from my links, which I"ll totally blow on waffle fries and sweet tea, y'all!**

[Video] Buffalo Chicken Dip recipe – Healthy and Easy!

**This post may contain affiliate links. I receive a small amount of compensation when you purchase from my links, which I"ll totally blow on waffle fries and sweet tea, y'all!**


One thing I love about summer time is all of the fun cookouts and get togethers with family and friends.  The kids’ birthdays start in May and run through September, so we are always having some sort of celebration around here!  As I’ve been working to change my eating habits (and mindset), I’ve been playing around with different recipes that I love to make for parties, and tweaking them to make them healthier.  One of my favorite party dips is a hot bubbly Buffalo Chicken Cheese Dip, but it’s no secret that it’s not too healthy!  When BzzAgent sent me some of Green Giant’s new veggie chips to try out a few days ago, they included a Zesty Cheddar flavor and I figured it would be the perfect chip to try out with a healthier chicken dip.  They’ve already got a nice cheesy taste, so I knew I could use that flavor in place of the normal cheddar cheese overload in the traditional recipe.  Check out my healthy twist on Buffalo Chicken Dip below, and let me know what you think!

Buffalo Chicken Dip - Healthy and easy!

Healthy Buffalo Chicken Dip

Ingredients:

2 cups of chopped chicken (I use canned)

2 cups Greek yogurt

1 pack of ranch dressing mix (3 Tbs)

3 Tbs hot sauce

3 Tbs green onion

1 tsp salt

1 tsp garlic powder

3/4 tsp pepper

Diced tomatoes and green onion for garnish (optional)

Buffalo Chicken Dip - Healthy and easy!

Directions:

1. Combine all ingredients, making sure to mix well.

2. Top with tomatoes and green onions.

3. Serve with chips or veggie sticks.

It’s that easy!

Buffalo Chicken Dip - Healthy and easy!

This healthy Buffalo Chicken Dip would also make a delicious chicken salad or spread.  Just use 1 cup of yogurt instead of two, and you may want to use a little less hot sauce (unless you like a like of spice).  Much better for you than a salad made with mayo for sure!

Buffalo Chicken Dip - Healthy and easy!

What’s your favorite healthy party dip recipe?  Share below!

BzzAgent did send my family some Green Giant chips to try out, but I was not compensated for this post.  The chips just happened to work perfectly with my dip recipe!

Keep on saving!  :o)
--Barbara

**Remember, y'all, this post may contain affiliate links. I receive a small amount of compensation when you purchase from my links, which I"ll totally blow on waffle fries and sweet tea, y'all!**

Easter recipes – Kid friendly bunny cinnamon rolls

**This post may contain affiliate links. I receive a small amount of compensation when you purchase from my links, which I"ll totally blow on waffle fries and sweet tea, y'all!**


Earlier this week I shared a fun Easter recipe for kid friendly Breakfast Easter Baskets.  Another one of the Easter recipes I came up with that we tried out recently was inspired by these Bunny Rolls that I found on Pinterest.  They are so easy to make, and literally only use one ingredient.  I hope you and your family enjoy them as much as my family does!

Easter bunny cinnamon rolls

Easter Bunny Cinnamon Rolls

(Makes 8 bunny rolls)

Ingredients:

1 tube/can cinnamon rolls with icing (that’s it!)

Easter bunny cinnamon rolls

Directions:

1.  Preheat oven to 400.

2. Pop open tube and remove icing packet.

3. Unroll dough into long flat strips.

4. Cut 3 one inch segments from the end of each strip for two ears and a tail.

5. Roll up 2/3 of the remaining dough strip.

6. Starting from the other end of the strip, begin rolling the dough in the opposite direction. (Like an S)

7. Press two 1″ strips onto the smaller round part at the top (the head).

8. Pinch another 1″ strip in half and press it onto the side of the larger bottom part (the body) to make the tail.

9. Place bunny rolls onto a greased baking sheet.

10. Bake for 10-12 minutes until lightly browned.

11. Remove from heat and drizzle with icing before serving.

(For a printer friendly version of this recipe, click here) 

Easter bunny cinnamon rolls

I hope you enjoy this fun Easter recipe, I know we did!  What’s your favorite Easter recipe to share with your family?

Keep on saving!  :o)
--Barbara

**Remember, y'all, this post may contain affiliate links. I receive a small amount of compensation when you purchase from my links, which I"ll totally blow on waffle fries and sweet tea, y'all!**

Atlanta's Frugal Mom is a participant in the Amazon Services LLC Associates Program, an affiliate advertising program designed to provide a means for sites to earn advertising fees by advertising and linking to Amazon. In other words, if you click through to Amazon from some of the books or products I recommend and make a purchase, I get a small percentage in exchange for your purchase. It's a small way you can support AFM.