Archives for October 2012

10 Essential Newborn Items *Possible Baby Shower Gifts*

**This post may contain affiliate links. I receive a small amount of compensation when you purchase from my links, which I"ll totally blow on waffle fries and sweet tea, y'all!**


Since my sister is weeks away from welcoming her first in to the world, I can’t help but find myself wondering around Amazon and other sites, looking at all the latest and greatest in the world of “baby stuff”.  (You know, since MY little guy is approaching his one year birthday…)

I recently came across this list of “Newborn Essentials” — and it claims to be 10 items “You Probably Didn’t Know You Needed”

While I think much of this is true, I can’t help but wonder, if y’all agree or disagree?  What would you add or take off this list?  :o)  I have SEVEN of these items — and y’all know I think many baby items aren’t essential!  Of course, every baby’s nursery should be filled with board books as well as well-loved classics to read aloud to your kids.

This list was compiled by Amazon here: 10 Essential Newborn Items and I added my own two cents, along with a few other things *I* find essential!  Would love to hear y’alls thoughts. 🙂

essential newborn items - moses basket

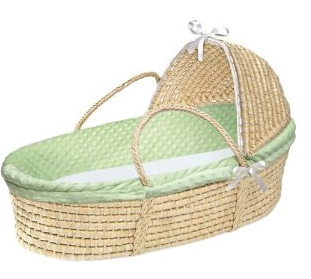
10.  A moses basket – designed to allow you to move a slumbering newborn from room to room, since that’s their primary job.  But please advice, you should NOT carry infant in said basket, as it’s neither designed nor sturdy enough for carrying a baby.  (So what’s the point of it, then??)

essential newborn items - diaper caddy

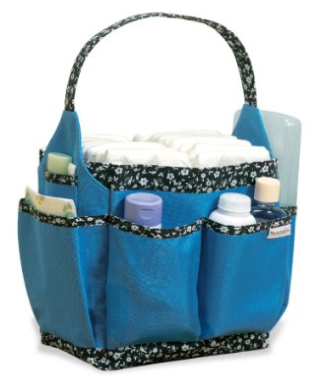
9. Diaper caddy – Meh.  This is also designed to make it easy to change baby anywhere.  But, IMO, unless you live in a luxurious, super-spacious mansion, why not just take baby to a dedicated diaper-changing spot?  We always kept a “station” downstairs in the den for diaper changes.  Mostly done on the floor.  (Did I mention, we never really used a changing table, too – especially with my second child?)

essential newborn items - portable swing

8. Travel swing – Ok.  So baby swings can be big, bulky space-suckers, but also complete life-savers for many a’weary parent or cranky baby.  So the best of both world are travel swings: they can fold up and come with you around the house, on the porch, wherever you need it to go!  You can usually pick one up second hand at a garage sale, consignment sale, or a local Facebook sell/swap group for under twenty bucks.

 essential newborn items - baby carriers

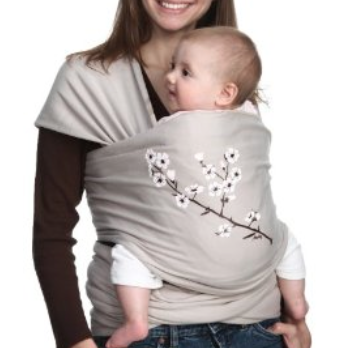
7.  sling or wrap – Hands down, I big-fat-puffy-pink-heart LOVED carrying/wearing my children.  For my daughter, I had a secondhand Baby Bjorn, and I snuggled with her particularly when I went to the grocery store, until she was big enough to sit up in the cart seat (with a cushiony grocery cart seat cover, of course!)  Once my son came along, a carrier become imperative!  Luckily, I was gifted a Moby Wrap – and, man!, once i got the hang of that thing, it was absolutely FANTASTIC, not to mention essential to keep me hands free with two children.  There are so  many carriers, slings, and wraps out there – you’re bound to find one that works for you and your baby.

essential newborn items - rocker/glider6.  glider – My son is two years old, and we still snuggle in our old, secondhand rickety glider.  Gliders/rockers are an essential luxury for bonding with your little ones – whether its used for nursing, reading, or just plain ol’ rocking.  Some of my sweetest moments with each of my children happened while rocking.

 essential newborn items - swaddle blanket

5.  swaddle blankets – holy moly!  I don’t know what parents with newborns did before these magical, miracle blankets! The very best advice I got when my son was a newborn and not fond of sleeping at night was to wrap him in a swaddle blanket, give him a paci, and crank up the sound machine.  As an added benefit, “baby burritos” just look so darn cute, don’t they?  😉  There are so many options to choose from, too: sleep sacks, straight-up swaddle blankets, and fitted/formed swaddling “pods”.  You can also check out more on baby sleeping advice here.

essential newborn items - sound machine

4.  white noise machine – Again, along with the swaddlers, I found the sound machine to be a God-send.  In fact, my kids are well past infancy, but they still sleep with one.  They are fantastic for blocking out noise, which means you don’t need to achieve a silent household in order for your little one to slumber.  You can get an actual sound machine (<== that’s the one I have in each of my kids’ rooms), or even utilize a free app on your smartphone.

essential newborn items - waterproof mattress pad

3.  waterproof mattress pad – Let’s face it: babies create yucky messes.  Your baby will vomit at some point in his crib.  He will also have an explosive diaper in his crib.  (…and if a seasoned parent claims otherwise, smack them for me, please!)  So, why not minimize the amount of mess you’re cleaning, by protecting the crib’s mattress.  Actually, keep two waterproof mattress pads on hand, so you can easily change the crib sheets AND the mattress pad all at once.

essential newborn items - burp cloths

2.  Ok, here’s where Amazon and I differ greatly…  Their list has a nasal aspirator listed in the #2 spot.  But, ….I just can’t put this on *my* personal “essentials” list.  Instead, I give a nod to good ol’ fashion burp cloths.  Not only do they serve a very practical purpose, but both of my kids adapted them as “blankies” with which they cuddle and sleep with, even at (almost) five years old!  Mine love the Gerber terry cloth burp cloths, which come in adorable patterns and in multi-packs.  For the purposes of actually USING a burp cloth, I love the Gerber flat fold 10-pack.  They come in white, and are handy for wiping up any mess a baby can -um- throw your way.  And once your littles are older, they make great dust cloths, too!

essential newborn items - breast pump

1.  breast pump device – Yes, yes, and yes.  Even if you don’t intend to bottle feed, a pump is your breast-feeding BFF.  If pumping will be a regular part of your routine, a hands-free pump simply allows you to more easily go about your business whilst pumping.  Plain.  And.  Simple.  You don’t *need* anything fancy, particularly if you end up with a baby who won’t take a bottle (like my firstborn!), but at the very least, every nursing mother will need relief from time to time.  Also, keep in mind that insurances these days will help with the cost.  (Check with your provider for more information.)

***Check out how to find and stock up on cheap diapers!  That’s certain an essential newborn item, I’d say.***

Did you know you can easily set up a baby registry via Amazon?


Keep on saving!  :o)
--Barbara

**Remember, y'all, this post may contain affiliate links. I receive a small amount of compensation when you purchase from my links, which I"ll totally blow on waffle fries and sweet tea, y'all!**

Bib Clip: Making Feedings (A Little Less) Messy

**This post may contain affiliate links. I receive a small amount of compensation when you purchase from my links, which I"ll totally blow on waffle fries and sweet tea, y'all!**


Perhaps knowing that I would one day have a son, I bough gender-neutral “toddler” pullover bibs when my daughter outgrew her “baby” bibs about two years ago.  ( I opted for the Cookie Monster and Elmo combo, similar to these here.)

Fast forward to the present, I have baby boy intent on constantly pulling off his “baby” bibs (basically any velcro or snap-on bib).  So a few weeks ago, I decided to try putting him in his sister’s old pullover ones.  The problem being, however, those were too long, and resulted in a gaping hole up front, allowing some of most of his food to fall through on to his shirt – thus, defeating the purpose of said bib! 

My solution?  I clipped the bib in the back, about an inch away from his neck — and voila!  No more messes!
Keep on saving!  :o)
–Barbara 
**This post may contain affiliate links.**

Follow Me on Pinterest

Keep on saving!  :o)
--Barbara

**Remember, y'all, this post may contain affiliate links. I receive a small amount of compensation when you purchase from my links, which I"ll totally blow on waffle fries and sweet tea, y'all!**

Homemade "Pixie Dust"

**This post may contain affiliate links. I receive a small amount of compensation when you purchase from my links, which I"ll totally blow on waffle fries and sweet tea, y'all!**


Rumor has it, when mixed with happy thoughts, this edible, homemade pixie dust will lift your right off the ground.  ;o)


Riding the coattails of our trip to Disney World last month, I decided to create homemade (and edible) “pixie dust” for my daughter. It’s an easy thing to add to applesauce, PBJs, sprinkle a little over a plate of fruit — you name it! The best part? Thanks to my friends at NurturMe, it’s got peas and sweet potatoes in it!!

Here’s what I did. I used 1 package of NurturMe peas and 1 package of NurturMe sweet potatoes, combined with about 2 tablespoons of cinnamon, and 1 small tablespoon of sugar.  Voila!  Edible Pixie Dust.  


(Note: you’ll need to stir it a little bit before sprinkling on, as it tends to settle after a while.)

Keep on saving!  :o)
–Barbara
**This post may contain affiliate links.**

Follow Me on Pinterest

Keep on saving!  :o)
--Barbara

**Remember, y'all, this post may contain affiliate links. I receive a small amount of compensation when you purchase from my links, which I"ll totally blow on waffle fries and sweet tea, y'all!**

White bean and chicken chili

**This post may contain affiliate links. I receive a small amount of compensation when you purchase from my links, which I"ll totally blow on waffle fries and sweet tea, y'all!**


This week my younger sister came to visit with her 4 month old son.  We met up at my parent’s house right before noon, and my mother made mention of the fact that she forgot to go to the store to pick up something for lunch.  One of my favorite things to do is make meals from random pantry and fridge items.  So I quickly got to work.

white bean chicken chili

First I checked out the fridge and pantry shelves.

white bean chicken chili

white bean chicken chili

There wasn’t much in the fridge other than drinks and condiments, but I did find a bag in the freezer with one large chicken breast.  The pantry had a decent amount of canned goods to work with, so I was confident I could pull something together.

Here’s what I ended up with:

white bean chicken chili

I pulled out some diced tomatoes, white beans, corn and peppers, chicken broth, rice, lime juice, and tortillas.  All the fixings for a southwestern style chicken and bean chili!  In the spice cabinet, I found some cilantro, paprika, chili powder, garlic powder, and cumin.

Once I had everything together and a plan in mind, this recipe only took about 15 minutes to prepare.  Check out the recipe below!

Cilantro Lime Rice

Ingredients:

1 1/2 cups rice

3 cups water

2 tsp lime juice

1/2 tsp cilantro

Directions:

1.  Add all ingredients to a large microwave safe bowl and cover.  Cook on high for 10 minutes.

2.  Stir and cook again for 5 for minutes.

3.  Remove from microwave and set aside.

white bean chicken chili - cilantro lime rice

White Bean and Chicken Chili

Ingredients:

1 large chicken breast

1 Tbs oil

1 can corn with peppers

1 can diced tomatoes

1 can white beans

2 cans chicken broth

1 tsp chili powder

2 tsp garlic powder

1/2 tsp paprika

1 tsp cumin

1/2 tsp salt

1/4 tsp pepper

2 Tbs cornstarch

1/4 cup water


Directions:

1.  Trim chicken of all fat and cut into small cubes.

2.  Heat pot to medium-high and add in oil.

3.  Add chicken to pot and cook until no longer pink.

4.  Drain tomatoes, beans, and corn.  Add to pot.

5.  Season mixture with spices, stirring well to coat.

6.  Pour in chicken broth and bring to a boil.

7.  Whisk cornstarch and water together, making sure to break up any lumps.  Add into pot and stir until thickened.

8.  Remove from heat.


Tortilla Strips

Ingredients:

2 small tortillas

1 Tbs oil


Directions:

1.  Preheat oven to 450.

2.  Cut tortillas into strips.

3.  Toss with oil until coated.

4.  Spread strips out on a pan and bake until browned.

5. Remove from heat and use to top chili.


To serve, place a scoop of rice into each bowl.  Ladle the chili over the rice and top with tortilla strips.  If you have sour cream, it makes a great addition to this tasty dish!

Just because you haven’t gone shopping or you don’t have a meal planned, doesn’t mean that you don’t have the ingredients you need already in your kitchen.  Putting together a last minute meal is easier than it seems, it just requires you to think outside the box!

Click here for a printer friendly version of this recipe!

Keep on saving!  :o)
--Barbara

**Remember, y'all, this post may contain affiliate links. I receive a small amount of compensation when you purchase from my links, which I"ll totally blow on waffle fries and sweet tea, y'all!**

Save Money With DIY School Snacks

**This post may contain affiliate links. I receive a small amount of compensation when you purchase from my links, which I"ll totally blow on waffle fries and sweet tea, y'all!**


As school days have become more hectic and crowded, our children now eat lunch just two hours after breakfast.  As a result, their teachers ask that they bring in a snack to help them get through the school day without being hungry.   Sometimes it can be tempting to purchase pre-packaged snacks, but is the time saved really worth the extra cost?  We pack our own snacks, check out these examples below:

DIY School Snacks - BIG money saver!


First up?  Cheezits.  You can buy the family size box or purchase the individual mini bags.

DIY School Snacks

21 ounces for $3.98

DIY School Snacks

15 ounces for $3.98

As you can see, both packages are $3.98.  However the family size box is 21 ounces, and the individual pack box is 15 ounces.  If you buy the large box and bag them up yourself, it’s only about $0.23 a serving, whereas the individual packs are $0.33 each.

Next up are Goldfish crackers.

DIY School Snacks

30 ounces for $6.98

DIY School Snacks

12 ounces for $4.48

DIY School Snacks

16 ounces for $2.38

Individual bags of Goldfish crackers cost $0.37 each.  If you buy the large box and bag them up yourself, it’s $0.23 a serving.  And if you take it a step further and purchase the off-brand Whales crackers, it’s only $0.15 a bag!

Another favorite in our home?  Yogurt covered raisins.

DIY School Snacks

$1.98 for an 8 ounce bag, or $2.98 for 8 boxes

An 8 ounce bag of yogurt covered raisins is enough for 8 snack bags, at only $0.25 each.  If you get the prepackaged boxes, the cost increases to over $0.37 per serving.

As you see from the pictures above, buying in bulk is always cheaper than buying individually packaged snacks.  Separating treats into snack bags only takes a few minutes, and can save several dollars each week.  My kids like to pack their own snacks, and it’s easy for them to do with a measuring cup.  It’s also a great way for them to build on their math skills!

DIY School Snacks

Packing snacks at home is simple!

For a quick review of the money we save by packing snacks ourselves, check out the numbers below:

For a week of prepackaged snacks:

Cheezits (x2): $0.33 x2 = $0.66

Goldfish: $0.37

Yogurt covered raisins (x2): $0.37 x 2 = $0.74

Total snacks for the week for our family: $1.77 per child x 6 = $10.62 ($382.32 for the year)


For a week of DIY snack bags:

Cheezits (x2): $0.23 x 2 = $0.46

Whales: $0.15

Yogurt covered raisins (x2): $0.25 x 2 = $0.50

Total snacks for the week for our family: $1.11 per child x 6 = $6.66 ($239.76 for the year)

While it may only seem like pennies each week, the savings really do add up.  Over the course of a school year, we save can save over $140 just by purchasing large packs of snacks and bagging them ourselves.  Of course, there is also the added cost of the snack bags themselves, but they cost about $0.02 each, which only adds up to another $20 over the span of the school year.  Reusable snack bags would drop that cost even lower.  If you REALLY want to save big, try making your own snack mixes and granola bars!

DIY School Snacks

Put snacks in a tub and let kids pick their own!

Could you use an extra $100 a year?  That’s enough to pay our gas bill, or 2 months of water, or 2 months of cell phone service.  Every little bit adds up, and counting pennies is a big part of staying within our budget.

Do you pack your child’s snacks at home?  Or do you feel like the convenience of prepacked snacks is worth the extra cost?

Keep on saving!  :o)
--Barbara

**Remember, y'all, this post may contain affiliate links. I receive a small amount of compensation when you purchase from my links, which I"ll totally blow on waffle fries and sweet tea, y'all!**

Treat yourself – Eat dinner at home and out for dessert

**This post may contain affiliate links. I receive a small amount of compensation when you purchase from my links, which I"ll totally blow on waffle fries and sweet tea, y'all!**


My kids love to go out to eat.  I mean, LOVE it.  Unfortunately, my wallet and bank account do not.  One thing that we have started doing is to eat dinner at home, and then take the kids out for dessert.  It’s not something we do all the time, but it’s a nice treat for them and a way to keep from spending a fortune on dining outside the home.

We usually go to a local ice cream shop instead of a sit down restaurant, so that we can keep the bill as low as possible.  Having worked in food service for several years, I always tip extremely well, but that’s difficult to do when you have a limited budget.  Instead of going to a full service restaurant and tipping a server, we just go to a self serve or counter service place where we can avoid paying a tip on top of our bill.  Two of our favorites are Five Spot and Brusters.


Eat dinner at home and grab dessert out for a cheaper way to treat yourself!

Five Spot is a frozen yogurt place where you purchase your desserts based on weight.  During the week the maximum price is $5.00, no matter what you get.  Friday through Sunday it’s only $0.44 an ounce.  Brusters single scoop cones are huge and can easily be split between two people.  They also offer free kid cones for children under a certain height.  If you’re lucky, you may be able to find a Brusters coupon book through your local school, they are only a couple of dollars and are full of BOGO coupons that never expire.

Of course, there are times when I would love to treat my family to a yummy dessert, but going out is just not an option.  I plan ahead for those times by buying a half gallon of ice cream when I’m doing my regular shopping, along with some cheap cones, whip cream, and sprinkles.  They may not get to choose from 50 different flavors, but they still enjoy the homemade ice cream sundaes just the same.

Do you enjoy the out-to-eat experience but find it hard on your wallet?  Have you ever considered just going out for dessert instead?

Keep on saving!  :o)
--Barbara

**Remember, y'all, this post may contain affiliate links. I receive a small amount of compensation when you purchase from my links, which I"ll totally blow on waffle fries and sweet tea, y'all!**

How I added 13 square feet to my pantry for only $63!

**This post may contain affiliate links. I receive a small amount of compensation when you purchase from my links, which I"ll totally blow on waffle fries and sweet tea, y'all!**


When we bought our home three years ago, our kitchen was really tiny.  There was a laundry room and “pantry” area beside it that led out to the garage.  We ended up knocking out the walls for that room, closing in the coat closet by the front door, and adding all of that space to the kitchen.  But I still just don’t have enough shelf space to store food for all eight of us.

I saw a post in the past about a roll out pantry that goes beside the refrigerator.  Our old fridge was too wide to do something like that, but we recently got a new fridge that was thinner, leaving us with about 8 inches of space between it and the wall.  So I decided a few weeks ago that it was time to get to work and make a roll out pantry for our home.

I started with a set of plans from Classy Cutter, but modified them to fit our family’s needs.  We need to have enough room for 2 rows of cans, as well as larger boxes of pasta, so I doubled the depth of the shelves to eight inches instead of four.  So instead of buying 1×4 pieces of wood, I got 1×8.  I just bought the cheapest wood available, as I’m on a pretty tight budget.  I also chose to make the bottom two shelf spaces slightly taller than the rest, so I can fit in larger items.  For the back I got a 4×8 piece of thin hardboard, it was about $12 and was in the plywood section.  Be sure to check out Classy Clutter to get the full details about how to make your own, their directions are really easy to follow!

DIY Rollout Pantry - 13sqft of space for $60!

Since I already had all of the screws and nails on hand, all I had to pick up was the wood, casters, dowels, and handle.

Supplies I purchased:

3 1x8x12 boards (cut on site into 2 64″ boards and 8 20.5″ boards)

1 sheet of 4×8 hardboard (cut down to 31.5 x 64 on site)

4 casters (2″ stationary 125 wheels, don’t get the swivel wheels, they make it hard to roll out the shelf)

7 dowel rods (I used 3/8″ rods, and just cut them down to size at home with a hacksaw)

1 cabinet handle (There are tons to choose from under $3.00 at Home Depot)

DIY Rollout Pantry - 13sqft of space for $60!

DIY Rollout Pantry - 13sqft of space for $60!


DIY Rollout Pantry - 13sqft of space for $60!

DIY Rollout Pantry - 13sqft of space for $60!

DIY Rollout Pantry - 13sqft of space for $60!

I didn’t want to bother with cutting each piece myself, so I had the associates at Home Depot cut them all for me.  Our local store will make several cuts for free, although they may charge a small fee for multiple cuts (ours is $0.25 each for anything over 2).  Even with the additional charge, it’s still worth it to me because I don’t have to spend the time to do it myself at home.  (Bonus: They didn’t charge us for the extra cuts, so I saved a few dollars!)

DIY Rollout Pantry - 13sqft of space for $60!

I’ve posted a few pictures below, but I will give you two big tips.  Make sure the wood you get from the store is STRAIGHT.  I thought our wood was, but once I started putting the shelf together, I realized there were some bowed pieces.  It still came out okay, but it took some extra screws and elbow grease before it was all said and done.  Also, for cheaper wood, be sure to check to cull lumber section of your store.  Home Depot often sells leftover cuts of wood for $0.51, so you may be able to save some more money that way.
DIY Rollout Pantry - 13sqft of space for $60!
I chose not to paint or decorate the shelf, as I really don’t care what it looks like, as long as I have the extra space for my food.  Maybe I’ll paint it eventually, but for now, I’m fine with the plain wood look.

DIY Rollout Pantry - 13sqft of space for $60!

For about $60 and a few hours of my time, I was able to add over 13 square feet of storage space to my kitchen area.  That’s a deal in my book!
DIY Rollout Pantry - 13sqft of space for $60!
Cost of supplies:

3 1×8 boards: $30
7 dowels: $7
Hardboard: $13
4 casters: $10
Handle: $3

Total spent: $63

Have you seen my DIY pot rack that freed up lots of cabinet space?  It’s less than $20 to make, and you can have it up in just 5 minutes!

Is your pantry area too small for your family?  What do you do when you can’t fit everything in the space you have now?
Keep on saving!  :o)
--Barbara

**Remember, y'all, this post may contain affiliate links. I receive a small amount of compensation when you purchase from my links, which I"ll totally blow on waffle fries and sweet tea, y'all!**

Money saver! Keep bottled water in your car

**This post may contain affiliate links. I receive a small amount of compensation when you purchase from my links, which I"ll totally blow on waffle fries and sweet tea, y'all!**


My kids are all old enough to be out of the sippy cup stage, but there are still times when we are out running errands and they ask for something to drink.  Rather than stopping at the gas station to get a sugary soda for a buck, I have started carrying bottles of water in my car.  I can pick up a case of 24 store brand bottles of water for about $3.00, which comes out to less than $0.13 a bottle.  I just throw them in the console in the front of our van, and I can pull them out and pass them around as needed.  It’s a quick, inexpensive way to have a drink on hand, and eliminates the need to stop at the gas station and get a drink.  And chips.  And candy.  And all the other things I tend to impulse buy when I’m walking up to the register.

water-saver-upright

Of course, if you are really organized, you could purchase some water bottles at the dollar store and fill them up before heading out, which would be even cheaper.  I have found that once I started carrying water with us, my kids are much less apt to ask for a drink, as they really aren’t thirsty, they just want a treat from the gas station.

water-bottle-side-by-side

Another great way to cut back on impulse spending while running errands is to keep some crackers or fruit snacks with you.  If I’m going grocery shopping before lunch time, it’s an easy way to keep the kids from “starving'” without breaking my budget.  Planning ahead is always a great idea, it’s just actually doing it that can be a challenge.

Do you find yourself stopping to purchase drinks and snacks for your kids while you are out and about?  How much money could you save each month if you just planned ahead and brought some along instead?


Keep on saving!  :o)
--Barbara

**Remember, y'all, this post may contain affiliate links. I receive a small amount of compensation when you purchase from my links, which I"ll totally blow on waffle fries and sweet tea, y'all!**

Atlanta's Frugal Mom is a participant in the Amazon Services LLC Associates Program, an affiliate advertising program designed to provide a means for sites to earn advertising fees by advertising and linking to Amazon. In other words, if you click through to Amazon from some of the books or products I recommend and make a purchase, I get a small percentage in exchange for your purchase. It's a small way you can support AFM.